Create and edit custom fields groups subgroups
Each custom fields subgroup represents a group of fields on a section of an application intake form.
To create a new subgroup
-
From the Administration menu, select Administration > Record type definition.
-
Expand the appropriate module, then select the Record type alias with which you want to work.
-
From the left menu, under Other associations select Custom fields group.
-
From the Custom fields group field, select the custom fields group to which you want to add a new subgroup.
-
Select View/edit.
-
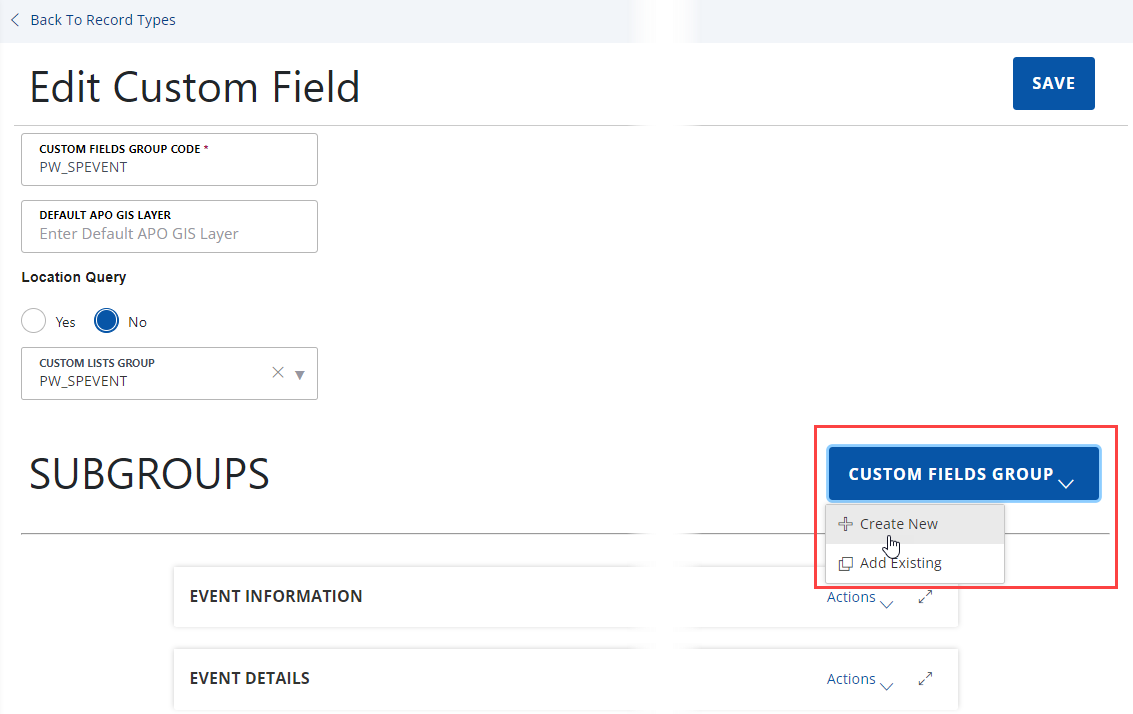
Select Custom fields group > Create new in the Subgroups section.
-
Complete the fields.
Note: Required fields have a red star next to the field name.Field Action ACA displayable This option controls the ability for residents to view custom fields in Citizen Access.
Example: You can specify whether or not a resident can view the property frontage information on a planning application.Select Yes to give users full or read-only access to custom fields in Citizen Access, then set the Custom fields security (see Security policies) to full or read-only.
Select No to hide the custom fields in Citizen Access.
Use the Hidden option for expressions when the value from a field not displayed on the form becomes updated by the expression or the expression criteria uses the value.
ACA searchable This option controls the ability for residents to search for custom fields in Citizen Access.
Example: Residents can search for the property frontage information on a planning application.Select Yes to allow users to search on custom fields in Citizen Access. Select No to hide the custom fields on the search form.
There are four combinations of settings for the ACA displayable and ACA searchable options:
-
If you select Yes for both options, the custom field displays and is available for use in the search form.
-
If you select Yes for ACA displayable, but No for ACA searchable, the custom field displays as read only in the search form.
-
If you select No for ACA displayable and Yes for ACA searchable, the custom field does not display in the search form. This is not best practice.
-
If you do not want the field to display in the search form, select No for both options.
Custom fields group code Enter a unique code to identify the custom fields group that you are creating.
If you are creating a subgroup for an existing group code, Civic Platform automatically populates this field with the group code that you are working with.
This field is read-only when you are editing a subgroup or adding a field to a custom fields group.
Custom fields subgroup Enter the name of the custom fields subgroup you are creating.
This field is read-only when you are editing subgroup.
Custom lists group Choose a custom lists group. You must create the custom lists group before you can choose it. For more information, see Create, edit, and delete custom lists and subgroups. Default APO GIS layer Enter the default APO GIS label. Default value Enter a default value for the field.
If you are adding a custom fields group, this field defines the default value for the first field in your subgroup.
Note: If you are setting up a drop-down list, you can add values to the drop-down list so that a user can choose between multiple values. For instructions, see Configure custom field and list drill-downs.
Display length Specify the maximum number of characters that Civic Platform displays. Display new custom field on existing records, meetings, contacts, and education/examination/continuing education Choose Yes to make the new user-defined field, table, or sub-group of user-defined fields available to existing education, examination and/or continuing education records in addition to being available for new records.
Choose No to apply the new user-defined objects to new records only.
Display order Enter a number to determine the position of the field in a subgroup.
If you are adding a custom fields group, this field determines the position of the first field in your subgroup.
Example: To display the field before any other fields, enter 1.Fee indicator To use the field value in fee calculations, enter the unique 5-digit code that you use to identify this variable in a fee formula. You must use a value between 10100 and 10599 and use the format displayed: $fixxxxx$
Example: Enter $fi10101$Field type Choose the type of field.
If you are adding a custom fields group, this field defines the type of the first field in your subgroup. For more information on field types, see Create and edit custom fields group.
If the field type is a drop-down list, select Edit to update, add, or delete values from the drop-down list. For instructions, see Create and edit custom fields group.
1st field label Enter the label of the field.
If you are adding a custom fields group, this field defines the label for the first field in your subgroup.
Example: If you want to prompt end-users to specify a date, enter the word "Date".Field label alias Enter an alias for the field created in 1st field label. Group display order Enter a number to specify the position of this custom fields group on an application.
Example: If you want this a custom fields group to display in the second position, enter 2.Justification Use the drop-down list to determine the justification of the field value.
Note: If you display Citizen Access in a Cyrillic font, which reads from the right side of the page to the left, you can specify a text justification that takes into consideration the font direction.The default setting uses left-alignment. If you cannot see any options, you must configure the related standard choice. For more information about the justification, see “Setting Custom Field to Right Justification” in the Internationalization Installation and Administrator Guide.
Location query Select Yes to support populating the custom fields with the map data from multiple GIS layers.
Select No to allow populating the custom fields only with the map data from the layer where the selected GIS object lies.
Max length Specify the maximum number of characters (up to 4000) that the field accepts. Required for fee calc To require users to complete the Fee calculation fields, select Yes.
Note: Fields required for Fee Calculation display a visual indicator ($) on an application form. You must configure FID 0242-Required for Fee Calculation to enable this feature.Required flag To require users to enter a value in this field, select Yes. Searchable flag To let users search for applications based on this field, select Yes. Status To let users see this group or this field in Civic Platform, select Enable or choose Enabled from the drop-down list; otherwise, select Disable or choose Disabled. Supervisor edit only Select Yes to make this information read-only to non-supervisor users after a user creates an application.
For instructions, see Set permissions for custom fields and custom lists.
Unit or New unit Enter any desired unit such as square feet, dollars, or miles that you want to attach to the field value.
Choose from standard choices or enter a new unit.
Note: If you are editing Custom fields subgroup, you cannot enter a new unit.
-
-
Select Save.
Note: The Save button is disabled until you have completed all of the required fields in the Add sub group section.
You can change the positioning of where a group of fields displays on an application intake form.
To change the display order of a subgroup
-
From the Administration menu, select Administration > Record type definition.
-
Expand the appropriate module, then select the record type with which you want to work.
-
From the left menu, under Other associations select Custom fields group.
-
Select the custom fields group.
-
Select View/edit.
-
Expand the existing subgroup for which you want to change the display order.
-
Enter the display order in the Display order field.
Example: If you want the subgroup to display first on the application intake form, enter 1. -
If you want to change order in which the fields display within a subgroup, select the Field label name.
-
In the Display Order field, enter the number that represents the field's position on the form relative to the other fields on the form.
-
Select Update.
If you no longer need a subgroup associated with an application specific information group code, you can remove the subgroup.
To delete a subgroup from a group code
-
From the Administration menu, select Administration > Record type definition.
-
Expand the appropriate module, then select the record type with which you want to work.
-
From the left menu, under Other associations select Custom fields group.
-
Select the custom fields group.
-
Select View/edit.
-
Select Actions > Delete next to each subgroup you want to remove.
To add an existing subgroup to a custom fields group
-
From the Administration menu, select Administration > Record type definition.
-
Expand the appropriate module, then select the record type with which you want to work.
-
From the left menu, under Other associations select Custom fields group.
-
Select the custom fields group to which you want to add an existing subgroup.
-
Select View/edit.
-
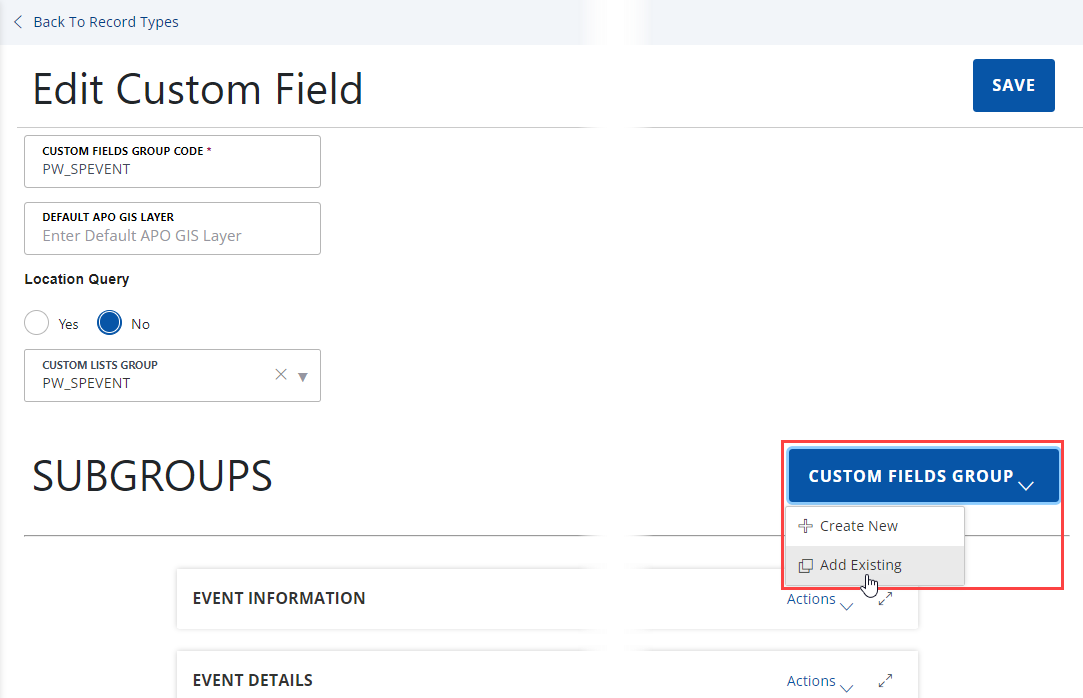
Select Customer fields group > Add existing in the Subgroups section.
-
Complete the fields.
Field Action Display new custom field on existing records, contracts, meetings, and education/examination/continuing Select Yes to apply the new custom field to existing applications.
Select No to apply the new custom field to new applications only.
If you cannot see the option, you must configure the related standard choice. Refer to the Accela Civic Platform Configuration Reference for additional information.
Group code Select a group code from which you want to add an existing custom fields group.
Subgroups Select the subgroup from the group code you selected in the Group code field. -
Select Add.
Note: The Save button is disabled until you have completed all of the required fields in the Add sub group section.
After you create a custom fields group, you might need to update a subgroup within the group. You can apply any changes you make to all subgroups. For information about applying or updating user access security permissions to a subgroup, see Security policies.
To edit a subgroup
-
From the Administration menu, select Administration > Record type definition.
-
Expand the appropriate module, then select the record type with which you want to work.
-
From the left menu, under Other associations select Custom fields group.
-
Select the custom fields group.
-
Select View/edit.
-
In the Subgroups section, you can edit the ACA configuration for the subgroup or the field labels within in the subgroup.
-
To edit the ACA configuration for the subgroup,
-
Select Actions > ACA configuration to the right of the subgroup name.
-
Make any necessary changes.
-
Select Update.
-
-
To edit the field label within the subgroup,
-
Expand the subgroup.
-
Select the Field label name.
-
Make any necessary changes.
-
Select Update.
-
-