Create, edit, and delete custom lists and subgroups
Administrators can set up custom lists that enable users to add custom data with zero-to-many relationships. This enables you to store the same data for multiple items. For example, you might want to store the quantity and manufacturer for different types of fixtures, such as bathtubs, sinks, and drains. The custom list name becomes the label that displays for the user.
A custom list can have as many data fields with as many individual data types as you require. You can make all of the table data fields available for use during fee calculation and for Event Manager Scripting Engine (EMSE) scripts.
Administrators can create new tables to let users add custom data to applications. Custom field tables can have as many data fields with as many individual data types as you need.
To create a Custom List
-
From the Classic Admin menu, select Application > Custom lists.
-
Select Add.
-
Complete the fields to define the structure of the custom list you want to create.
Field Description ACA displayable This option controls the ability for residents to view custom fields in Citizen Access. For example, you can specify whether or not a resident can view the property frontage information on a planning application.
Select Yes to give users full or read-only access to custom fields in Citizen Access, then set the Custom fields security (see Security policies) to full or read-only.
Select No to hide the custom fields in Citizen Access.
Use the Hidden option for expressions when the value from a field not displayed on the form becomes updated by the expression or the expression criteria uses the value.
ACA searchable This option controls the ability for residents to search for custom fields in Citizen Access. For example, residents can search for the property frontage information on a planning application.
Select Yes to allow users to search on custom fields in Citizen Access. Select No to hide the custom fields on the search form.
There are four combinations of settings for the ACA displayable and ACA searchable options:
-
If you select Yes for both options, the custom field displays and is available for use in the search form.
-
If you select Yes for ACA displayable, but No for ACA searchable, the custom field displays as read only in the search form.
-
If you select No for ACA displayable and Yes for ACA searchable, the custom field does not display in the search form. This is not best practice.
-
If you do not want the field to display in the search form, select No for both options.
Custom lists group code Enter a unique code to identify the Custom List group that you are creating. If you are creating a subgroup for an existing group code, Civic Platform automatically populates this field with the group code that you are working with. Custom list subgroup Enter the name of the subgroup you are creating. Custom lists group subgroup alias Enter the custom lList subgroup alias. The alias replaces the Custom List subgroup name in all areas where it displays to users in Civic Platform, Citizen Access, and Accela Mobile. Column name Enter the name of the first column for this table group. Default value Enter a default value for the first field in your custom list group.
If you are setting up a drop-down list, you can add values to the drop-down list so that a user can choose from multiple values. For instructions, see Create, edit, and delete custom lists and subgroups.
Display len Specify the maximum number of characters that Civic Platform displays. Display new custom fields on existing records Select Yes to apply the new custom field to existing applications. Select No to apply the new custom field to new applications only.
If you cannot see the option, you must configure the related standard choice. Refer to the Civic Platform Configuration Reference for additional information.Display new custom fields on existing contacts Select Yes to apply the new custom field to existing applications. Select No to apply the new custom field to new applications only.
If you cannot see the option, you must configure the related standard choice. Refer to the Civic Platform Configuration Reference for additional information.Display new custom fields on existing meetings Select Yes to apply the new custom field to existing applications. Select No to apply the new custom field to new applications only.
If you cannot see the option, you must configure the related standard choice. Refer to the Civic Platform Configuration Reference for additional information.Display new Custom List on existing Education/Examination/Continuing Education Choose Yes to make the new user-defined field, list, or subgroup of user-defined fields available to existing education, examination and/or continuing education records in addition to being available for new records. Choose No to apply the new user-defined objects to new records only. Display order Enter a number to determine the position of the first field in your Custom List group. For example, to display the field before any other fields, enter 1. Group display order Enter a number to determine the position of this list on the Custom lists section of an application in Daily Activities.
For example, if you want this information group to display in the second position, enter 2.
Req for fee calc Select Yes to require users to complete the Fee Calculation fields.
Fields required for fee calculation display a visual indicator ($) on the permit application form. You can configure this feature using the Function Identification (FID) 0242 Required for Fee Calculation.Required flag Select Yes to require users to enter a value in this field. Searchable flag Select Yes to make this custom list searchable within Civic Platform. Status Select Enabled to allow users to see this field in Civic Platform. Otherwise, select Disabled. Supervisor edit only Select Yes to make this information read-only to non-supervisor users after a user creates an application. For further information about this field, please see Create, edit, and delete custom lists and subgroups. Type Choose the type of the first field in your custom lists group. For more information on field types, see Create, edit, and delete custom lists and subgroups. -
-
Select Submit to save the new table group.
-
Select whether to apply changes to this subgroup only or to all subgroups.
-
Make any necessary changes to the columns in the subgroup.
-
To delete a column, select Delete next to the column you want to delete.
-
Select Update.
Administrators can edit custom lists. You can change the display order, add instructional text, and add or delete subgroups.
To edit a Custom List
-
From the Classic Admin menu, select Application > Custom lists.
-
Enter relevant search criteria in the Group code and Subgroup fields and select Submit.
To browse all tables, select Submit without entering any search criteria. -
Select the red dot beside the custom list that you want to edit.
-
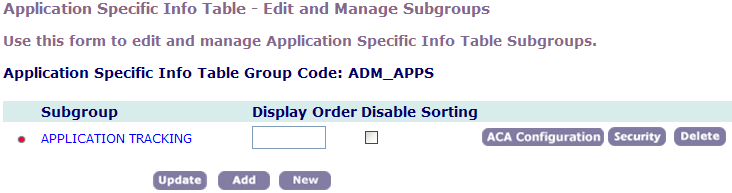
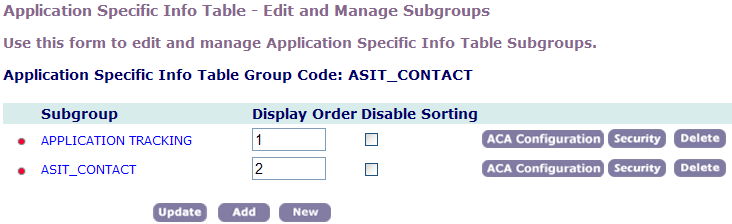
To change an existing subgroup’s display order, enter the number to determine the position in the Display Order field and select Update.
-
To allow users to sort custom list fields, clear the Disable Sorting check box. To prevent users from using the column sort, select the Disable Sorting option.
If you clear Disable Sorting, a sort control arrow displays on the heading of each custom list column in all applicable locations in Civic Platform. Users can sort a column in the custom list in ascending or descending order.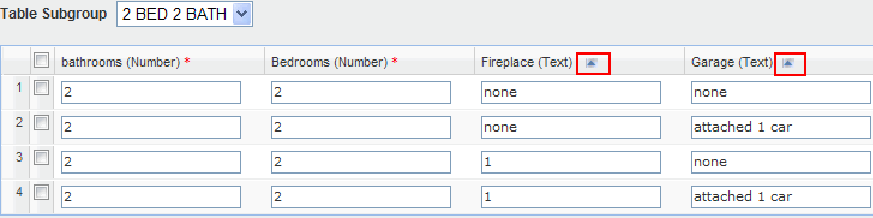
-
To add instructional text for a group, select ACA Configuration, enter instructional text into the Instructions text field, and then select Save.
-
To delete a subgroup, select Delete next to the subgroup you want to delete.
Deleting all subgroups from a custom list group also deletes the table group.
-
To add an existing subgroup from another table to the current table:
-
From the Custom lists - edit and manage subgroups page, select Add.
-
From the Group code drop-down list, choose the group code that contains the subgroup you want to add.
-
In the Subgroups field, select the subgroup you want to add.
-
Select Add.
-
-
To create a new subgroup:
-
From the Custom lists - edit and manage subgroups page, select New.
-
Complete the fields as necessary.
Field Description ACA displayable This option controls the ability for residents to view custom fields in Citizen Access. For example, you can specify whether or not a resident can view the property frontage information on a planning application.
Select Yes to give users full or read-only access to custom fields in Citizen Access, then set the Custom fields security (see Security policies) to full or read-only.
Select No to hide the custom fields in Citizen Access.
Use the Hidden option for expressions when the value from a field not displayed on the form becomes updated by the expression or the expression criteria uses the value.
ACA searchable This option controls the ability for residents to search for custom fields in Citizen Access. For example, residents can search for the property frontage information on a planning application.
Select Yes to allow users to search on custom fields in Citizen Access. Select No to hide the custom fields on the search form.
There are four combinations of settings for the ACA displayable and ACA searchable options:
-
If you select Yes for both options, the custom field displays and is available for use in the search form.
-
If you select Yes for ACA displayable, but No for ACA searchable, the custom field displays as read only in the search form.
-
If you select No for ACA displayable and Yes for ACA searchable, the custom field does not display in the search form. This is not best practice.
-
If you do not want the field to display in the search form, select No for both options.
Custom lists group code Enter a unique code to identify the Custom List group that you are creating. If you are creating a subgroup for an existing group code, Civic Platform automatically populates this field with the group code that you are working with. Custom list subgroup Enter the name of the subgroup you are creating. Custom lists group subgroup alias Enter the custom lList subgroup alias. The alias replaces the Custom List subgroup name in all areas where it displays to users in Civic Platform, Citizen Access, and Accela Mobile. Column name Enter the name of the first column for this table group. Default value Enter a default value for the first field in your custom list group.
If you are setting up a drop-down list, you can add values to the drop-down list so that a user can choose from multiple values. For instructions, see Create, edit, and delete custom lists and subgroups.
Display len Specify the maximum number of characters that Civic Platform displays. Display new custom fields on existing records Select Yes to apply the new custom field to existing applications. Select No to apply the new custom field to new applications only.
If you cannot see the option, you must configure the related standard choice. Refer to the Civic Platform Configuration Reference for additional information.Display new custom fields on existing contacts Select Yes to apply the new custom field to existing applications. Select No to apply the new custom field to new applications only.
If you cannot see the option, you must configure the related standard choice. Refer to the Civic Platform Configuration Reference for additional information.Display new custom fields on existing meetings Select Yes to apply the new custom field to existing applications. Select No to apply the new custom field to new applications only.
If you cannot see the option, you must configure the related standard choice. Refer to the Civic Platform Configuration Reference for additional information.Display new Custom List on existing Education/Examination/Continuing Education Choose Yes to make the new user-defined field, list, or subgroup of user-defined fields available to existing education, examination and/or continuing education records in addition to being available for new records. Choose No to apply the new user-defined objects to new records only. Display order Enter a number to determine the position of the first field in your Custom List group. For example, to display the field before any other fields, enter 1. Group display order Enter a number to determine the position of this list on the Custom lists section of an application in Daily Activities.
For example, if you want this information group to display in the second position, enter 2.
Req for fee calc Select Yes to require users to complete the Fee Calculation fields.
Fields required for fee calculation display a visual indicator ($) on the permit application form. You can configure this feature using the Function Identification (FID) 0242 Required for Fee Calculation.Required flag Select Yes to require users to enter a value in this field. Searchable flag Select Yes to make this custom list searchable within Civic Platform. Status Select Enabled to allow users to see this field in Civic Platform. Otherwise, select Disabled. Supervisor edit only Select Yes to make this information read-only to non-supervisor users after a user creates an application. For further information about this field, please see Create, edit, and delete custom lists and subgroups. Type Choose the type of the first field in your custom lists group. For more information on field types, see Create, edit, and delete custom lists and subgroups. -
-
Select Submit.
-
-
To edit an existing subgroup in the table:
-
From the Custom lists - edit and manage subgroups page, select the red dot beside the table subgroup you want to edit.
-
Edit the fields as necessary.
Field Description ACA displayable This option controls the ability for residents to view custom fields in Citizen Access. For example, you can specify whether or not a resident can view the property frontage information on a planning application.
Select Yes to give users full or read-only access to custom fields in Citizen Access, then set the Custom fields security (see Security policies) to full or read-only.
Select No to hide the custom fields in Citizen Access.
Use the Hidden option for expressions when the value from a field not displayed on the form becomes updated by the expression or the expression criteria uses the value.
ACA searchable This option controls the ability for residents to search for custom fields in Citizen Access. For example, residents can search for the property frontage information on a planning application.
Select Yes to allow users to search on custom fields in Citizen Access. Select No to hide the custom fields on the search form.
There are four combinations of settings for the ACA displayable and ACA searchable options:
-
If you select Yes for both options, the custom field displays and is available for use in the search form.
-
If you select Yes for ACA displayable, but No for ACA searchable, the custom field displays as read only in the search form.
-
If you select No for ACA displayable and Yes for ACA searchable, the custom field does not display in the search form. This is not best practice.
-
If you do not want the field to display in the search form, select No for both options.
Custom lists group code Enter a unique code to identify the Custom List group that you are creating. If you are creating a subgroup for an existing group code, Civic Platform automatically populates this field with the group code that you are working with. Custom list subgroup Enter the name of the subgroup you are creating. Custom lists group subgroup alias Enter the custom lList subgroup alias. The alias replaces the Custom List subgroup name in all areas where it displays to users in Civic Platform, Citizen Access, and Accela Mobile. Column name Enter the name of the first column for this table group. Default value Enter a default value for the first field in your custom list group.
If you are setting up a drop-down list, you can add values to the drop-down list so that a user can choose from multiple values. For instructions, see Create, edit, and delete custom lists and subgroups.
Display len Specify the maximum number of characters that Civic Platform displays. Display new custom fields on existing records Select Yes to apply the new custom field to existing applications. Select No to apply the new custom field to new applications only.
If you cannot see the option, you must configure the related standard choice. Refer to the Civic Platform Configuration Reference for additional information.Display new custom fields on existing contacts Select Yes to apply the new custom field to existing applications. Select No to apply the new custom field to new applications only.
If you cannot see the option, you must configure the related standard choice. Refer to the Civic Platform Configuration Reference for additional information.Display new custom fields on existing meetings Select Yes to apply the new custom field to existing applications. Select No to apply the new custom field to new applications only.
If you cannot see the option, you must configure the related standard choice. Refer to the Civic Platform Configuration Reference for additional information.Display new Custom List on existing Education/Examination/Continuing Education Choose Yes to make the new user-defined field, list, or subgroup of user-defined fields available to existing education, examination and/or continuing education records in addition to being available for new records. Choose No to apply the new user-defined objects to new records only. Display order Enter a number to determine the position of the first field in your Custom List group. For example, to display the field before any other fields, enter 1. Group display order Enter a number to determine the position of this list on the Custom lists section of an application in Daily Activities.
For example, if you want this information group to display in the second position, enter 2.
Req for fee calc Select Yes to require users to complete the Fee Calculation fields.
Fields required for fee calculation display a visual indicator ($) on the permit application form. You can configure this feature using the Function Identification (FID) 0242 Required for Fee Calculation.Required flag Select Yes to require users to enter a value in this field. Searchable flag Select Yes to make this custom list searchable within Civic Platform. Status Select Enabled to allow users to see this field in Civic Platform. Otherwise, select Disabled. Supervisor edit only Select Yes to make this information read-only to non-supervisor users after a user creates an application. For further information about this field, please see Create, edit, and delete custom lists and subgroups. Type Choose the type of the first field in your custom lists group. For more information on field types, see Create, edit, and delete custom lists and subgroups. -
-
-
Select Update.
Civic Platform has an option to delete custom field data and custom list columns from all reference and transactional records. You can do this to restrict custom fields subgroups to only display in a historical record, new records, or both. You can also completely remove custom list columns from historical transactional data, instead of just disabling the column.
If you delete the custom list subgroup, Civic Platform deletes the information from all custom lists related to the subgroup. If you delete the column within a custom list, you remove the column information, but the rest of the information in the custom list continues to display. When you delete either a column or subgroup, it removes the related data from custom list reference data, custom list transactional data, custom list drill downs, and custom fields security data. Expression records related to the deleted custom list column or subgroup remain intact.
The delete function is permanent. You cannot retrieve deleted subgroups.
You have several options when you delete a custom list column or subgroup. You can combine any of these options to determine the desired result. The first option is to apply the changes to only the selected subgroup or to all subgroups. The second is to remove the custom list column or subgroup from the reference and associated checklist transactional records. The third option enables you to hide the custom list columns and subgroups for future records, but leave them visible in historical records.
To delete Custom List columns and subgroups
-
From the Classic admin menu, select Application > Custom lists.
-
Enter relevant search criteria in the Group code and Subgroup fields and select Submit. To browse all tables, select Submit without entering any search criteria.
-
Select the red dot beside the custom list that you want to edit.
-
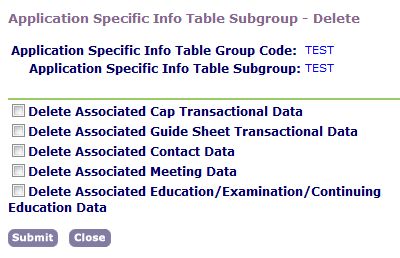
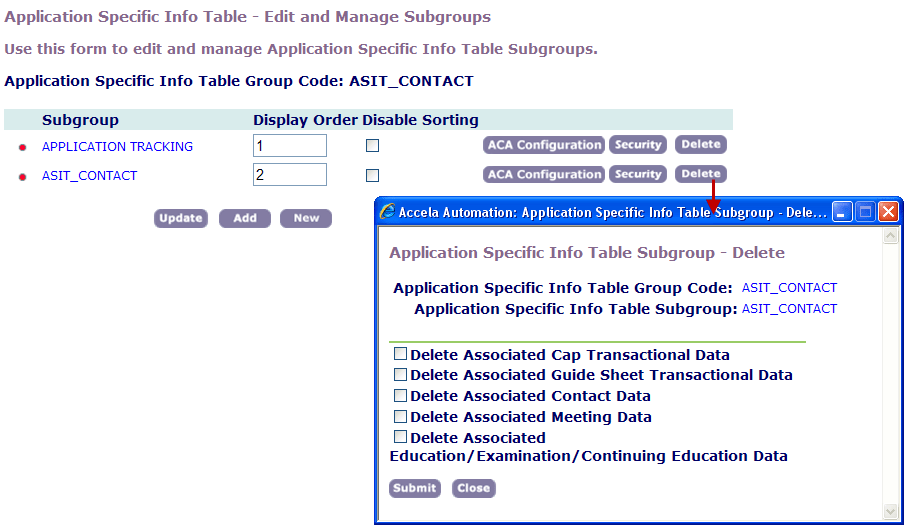
To delete the entire subgroup, select Delete.
-
Select the associated data you also want to delete.
Select Submit.
-
To delete a column within the Custom List subgroup, select the red dot next to the subgroup, then select Delete next to the column you want to delete.
-
Do one of the following:
-
If you are deleting a Custom List column, select either Apply changes to this subgroup only or Apply changes to all subgroups. If you select Apply changes to this subgroup only, Civic Platform only removes the column from the current subgroup. If you select Apply changes to all subgroups, Civic Platform removes the column from all of the subgroups in which the Custom List displays.
-
To hide the column and subgroup for future records, but leave them visible in historical records, select Submit without selecting any options.
-