Work with pages in page flow
The page flow process contains two types of pages: Static and dynamic. The only pages which require administrative configuration are dynamic pages. These pages are used to collect and populate user information into the application intake form. This is done by adding at least one SmartChoice component to each page. Multiple pages can be grouped together to form a step or multiple steps in a page flow. Customize the name of the page and apply components to create a step and page flow that functions effectively for the record type. Select a step from the page flow and choose one of the following five page options: adding, naming, moving, associating scripts with a page, or deleting a page. The last step in the page flow is the receipt page. You can access the various receipt pages from this step and customize them for the module. For more information, see Work with pages in page flow.
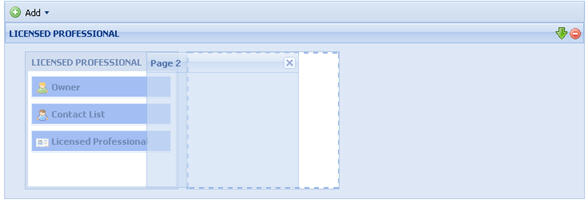
Add a page
Add pages to a page flow to create the presentation of component information during the user experience of the application process.
To add a page
-
Select the step to which you want to add a page.
-
Select Add.
-
Choose Add new page from the list.

Name a page
Name or rename a page to clarify the presentation of information during the user experience.
To name a page
-
Select the page which requires a new name or a name change.
-
Verify the Property tab is displayed in the Component settings right panel.
-
Enter the new name for the page in the Page name value cell.

-
Select Save.
Move a page
Move pages within a page flow to create the desired application user experience.
To move a page
-
Select the page you want to move.
-
Drag and drop the page to reflect the correct page order within the step.
-
Select Save.
Note: You cannot move a page from one step to a different step. You must add a page to the correct step and then drag and drop the page flow components from one page to the other. For more information about moving components, see Move or delete a component.
Associate scripts with a page
Accela provides a way to trigger specific EMSE scripts as the user enters data and moves from page to page in the application process. You must have the parameters defined for what action the EMSE script performs. This is particularly effective when it comes to providing public users with the ability to begin the creation of a record and then step away from the process to resume at a later time or date. When a public user starts and stops an application, Civic Platform creates a partial record. If you define specific scripts to run in coordination with pages, you eliminate the need to wait until an application is submitted or completed for events to fire.
For example, a plumber adds their license information during the application process for a plumbing permit and clicks the Continue button to move to the next page. Before the next page loads, an EMSE script (OnLoginBefore or OnLoginAfter) is fired to verify the license validity and expiration date at an external state government office.
Another example, a citizen enters address information on a web page in the application process and clicks the Continue button to move to the next page. Before the next page loads, Civic Platform runs a script behind the scenes to auto-populate data on the next page to display relevant record types.
Another example, in the application process for a barber shop license, a public user selects the type of business (partnership, corporation, and sole proprietor) on the Applicant page, and clicks the Continue button to move to the next page. Before the next page loads, an EMSE script is fired to decide what the next page is based on the selected type of business. For example, if the public user selects "partnership", the next page is the Partner List page; if he selects "corporation", the next page is the Corporate officer list page.
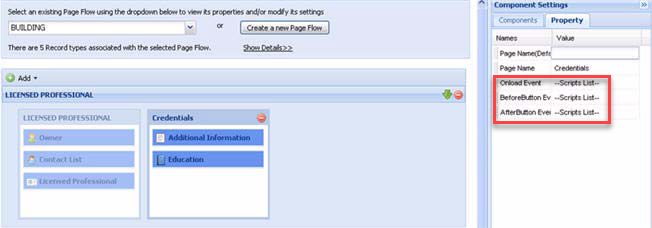
In order to define a script on a page, you must navigate to the properties section for a page in the page flow and select an EMSE script and a corresponding time to run it. You can choose to run the script Onload event, BeforeButton event, or AfterButton event. Onload event runs before anything loads on a page or user sees the page. BeforeButton event runs after a button is clicked on the page, but before the data entered or changed is saved to the database. The AfterButton event runs after the data is saved.
You can use a script to hide a page or direct public users to a specific page in a specific step according to the data that the users entered on a previous page. To hide a page, you can define a script on the page and select the Onload event. To jump to a specific page based on the data entered on a previous page, you can associate a script to the AfterButton event on the previous page. It is optional for you to use one or both scripts in one page flow. Both scripts are recommended to include the action of clearing the data on the hidden pages, which ensures that public users can successfully modify the application data from the Review Information page or modify some data on a partial application.
The OnloginBefore and OnLoginAfter EMSE scripts that are used to verify license information during a page flow are bound with the universal ValidateLicense function. For more information about EMSE scripts, please refer to the “Event Manager and Script Engine” section in the Accela Civic Platform Scripting Guide. You can also refer to the Registration and Login. For more information about license verification, see License verification and online renewal. For validation of contact information during record creation, see Registration and account management.
To associate an EMSE script to a page
-
Navigate to Citizen Access setup > Modular tab > Page flow configuration.
-
Select a page flow code from the drop-down list or create a new page flow.
For information on how to create a page flow, see Associate record types with a page flow.
-
Select a page in the flow.
-
Use the lists to select the script you want run Onload event, BeforeButton event, and/or AfterButton event.
-
Select Save.
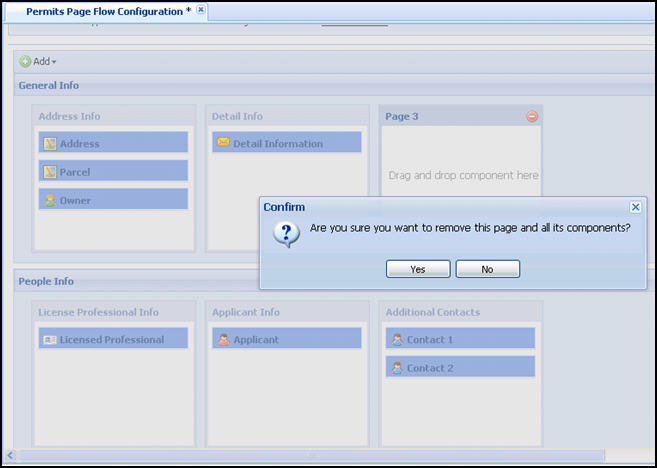
Delete a page
Administrators can delete a page at any time. This may be useful if you want to combine information on a page, thus requiring one to be deleted.
To delete a page
-
Select the page name to select the page which requires deletion.
-
Select the delete icon, or red circle, to remove the page from the step.
-
Select either Yes to remove the page or No to cancel.
If you delete the page from the step, Citizen Access returns the components to the components list.
- Select Save.