Attach reports to a portlet with the Report button
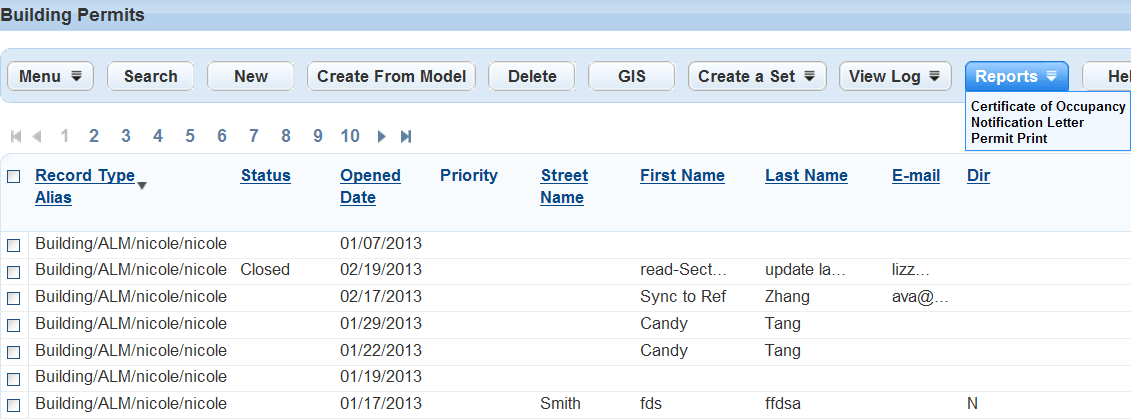
Users can run reports against a single record or small set of specific records. These portlet-specific reports are accessible from the Reports menu located on a list or form, as shown in the screen shot below. Examples of these reports include permit print, certificates of occupancy, and notifications.
The Reports menu is accessible from any portlet within Civic Platform when you add at least one report to a portlet. The reports that display in each portlet vary depending on the user group and module permissions specified for each report. An administrator must assign user groups and modules to each report so that users can access them.
Portlet-specific reports generally use the Accela provided parameters that use a selected record or set of records to filter data in a report, which enables users to run very specific reports without having to enter parameter values. For example, a permit report generates when a user selects a specific permit from the Building portlet and runs the report. If the values required to run the report are not available, the report can return incorrect results and errors. For these types of reports, the report can be grayed out in the report menu so that users cannot run the report. For example, to run a report on approved building permits, the permit must have a status of Approved in the Building portlet. If the building permit has any other status, the report is grayed out in the Report menu, preventing the user from running the report. This feature not only prevents users from printing incorrect reports but provides a list of valid reports for the specific record.
If you use Citizen Access, you can display a Print/View report button on the user interface for a specific report. Assign the record type report to a button by selecting the button name from the Portlet name list. For more information on how to assign a report to a Print/View button in Citizen Access, refer to the Citizen Access Administrator Guide.
Topics
Add a report to a portlet
Best practices for setting up the Report button
- If you want to run a report for a single permit or record, add the Report button to the Record page for the relevant record ONLY. Do not add the Report button to the Report list page, and do not add the Report button to the Record list page.
- If you want to run a report for multiple permits or records, add the report itself (not the Report button) to the Reports list page or the Reports menu on the Record list page.
Define criteria for a portlet-specific report
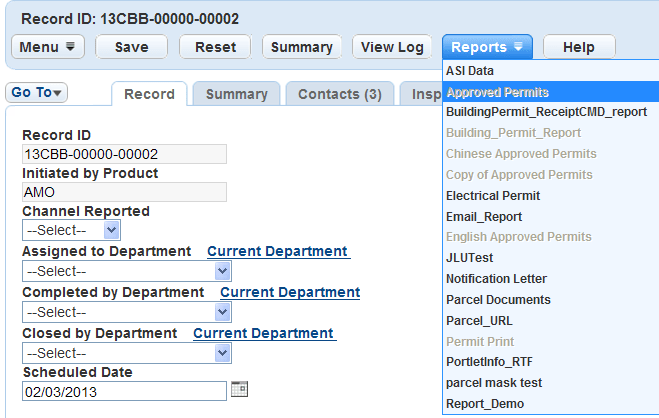
Portlet-specific reports generally use the Accela provided parameters that use a selected record or set of records to filter data in a report, which enables users to run very specific reports without having to enter parameter values. For example, a permit report generates by selecting a specific permit from the Building page and running the report. If the values required to run the report are not available within the selected record, the report can return incorrect results and errors. For these types of reports, the report can be disabled in the Report menu so that users cannot run it. For example, to run a report for approved building permits, the status must be Approved on the selected record. If the permit has any other status, the report displays inactive or grayed out in the Report menu, as shown in the screen shot below. This feature prevents the user from selecting and running a report that is not applicable to the selected record or set of records.
For reports associated with Civic Platform portlets, you can set criteria only for form portlets. The criteria option is not applicable to list or search portlets. If you associate several reports with the same Citizen Access Print/View button, you must set the criteria for every report.
To set criteria for a portlet-specific report
-
From the Administration menu, select Report > Report manager.
-
Expand the category that contains the report.
-
Select the report you want.
-
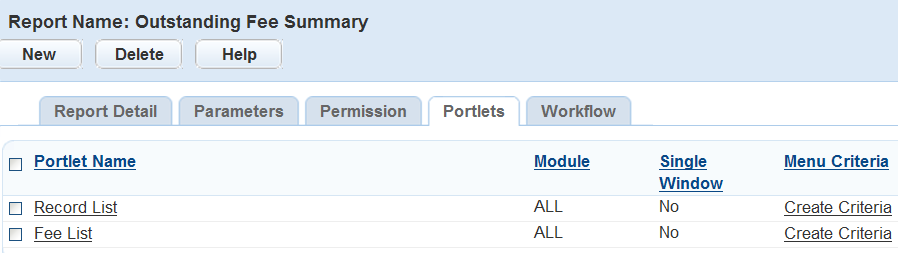
Select the Portlets tab.
-
Select the Create criteria or Edit criteria link for the portlet to which you want to add criteria.

-
Complete the fields.
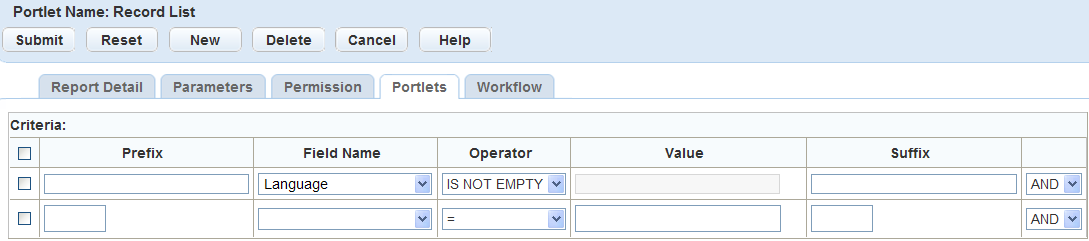
Field name Field description Prefix Enter the prefix for the field name you want to use to set the criteria. You can also use Prefix to handle complicated criteria using brackets for the LIKE and OR expressions. See the image below. Field name Select the portlet field for which you want to set criteria on the selected portlet. For example, to set criteria for building permits with an Approved status, select a field name of Status, and Operator of =, and a Value of Approved. Operator Select the appropriate operator you want to use in the criteria formula for the selected field. For example, to set criteria for building permits with an Approved status, select a field name of Status, and Operator of =, and a Value of Approved. Value Enter the appropriate value used to determine the criteria. For example, to set criteria for building permits with an Approved status, select a field name of Status, and Operator of =, and a Value of Approved. You can also use the wildcard % with the value. For example, to include all Permit Types that start with “Building,” use the value “Building%” with the wildcard. Suffix Enter the suffix for the field name you want to use to set the criteria. You can use Suffix to close complicated criteria using brackets in the Prefix for LIKE and OR expressions.
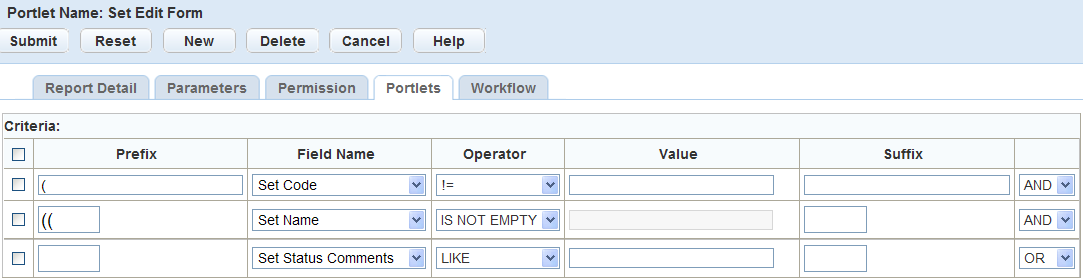
AND/OR Select one of the following to join two or more criteria conditions. AND operator displays a row of ALL conditions listed that are true. OR operator displays a row of ANY of the conditions listed that are true. -
Select New to add additional criteria to a portlet.
-
To delete a field, select the field and select Delete.
-
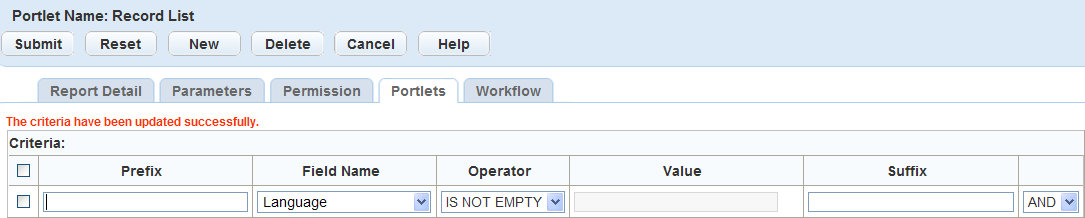
When you finish adding criteria, select Submit.
Make sure you remove all blank criteria before submitting the record. If you submit a record with blank criteria, the update fails, Civic Platform deletes the blank record, and you must submit the records again.
-
Select Cancel to return to the list view in the Portlets tab.
Remove a report from a portlet
You remove reports from a portlet by removing the reference to the portlet. When you remove a report, it no longer displays in the Report list. If you are removing the only report associated with the portlet, the Report list disappears. There must be at least one report assigned to the portlet in order for the report menu to be display.
To remove a report from a portlet
-
From the Administration menu, select Report > Report manager.
-
Expand the category that contains the report.
-
Select the report you want to remove from the portlet
-
Select the Portlets tab.
-
Select the portlets you want to remove the report from.
-
Select Delete.
Example: Set a portlet for meeting reports
You can configure reports so that agency users can access and run reports from the Meeting agenda portlet in the Calendar list portlet and the Meeting record tab in the Record list portlet.
You must add Meeting reports to Report Manager before you can set the portlet display. For instructions on how to add a report, see Add a report.
To set up a portlet for a meeting report
-
From the Administration menu, select Report > Report manager.
-
Expand and collapse the tree nodes to find the meeting report you want to modify.
-
Select the Portlets tab.
-
Select New.
-
If you want the selected report to display on the Meeting agenda page, select List - Meeting agenda list from the Portlet name menu. If you want the report to display on the Meetings tab in the Record list screen, select List - Record meeting list from the Portlet name menu.
-
Complete the remaining fields.
Field Field description
Module Select a module from the drop-down list that indicates where you want the report to display. Display Select a value from the drop-down list that indicates if you want the report to display in one or more windows. Description Enter a report description. For example: “The meeting report displays the meeting date, location, and associated applications.” -
Select Submit.