Create a PM Schedule Batch Jobs
You can create a batch job that automatically generates work orders in advance of a scheduled preventative maintenance. The batch job generates all work orders associated with the PM schedule in a time frame you determine. Schedule the batch job to correspond with the PM schedule so that Civic Platform generates work orders at the same time interval as the PM schedule.
To create a new preventative maintenance schedule batch job
-
From the Administration menu, select System tools > Batch engine.
-
Select New.
-
Complete the following fields:
Field Action Name (Required) Enter an intuitive name for the batch job. Description Enter a brief description of the batch job. Email Enter the email address where you want Civic Platform to send emails after job completion, regardless if the job is successful or not.
You can configure the email template named NOTICE_OF_BATCH_JOB_COMPLETED to customize the notification. For information about how to edit an email notification template, see Communication manager.
Job type (Required) Select System from this menu. Service category Select PM schedule.
Note: This field displays after you select a job type . -
Select Submit.
-
Associate PM Schedule(s) to the batch job as follows:
-
Select the PM schedule tab.
-
Select Look up.
-
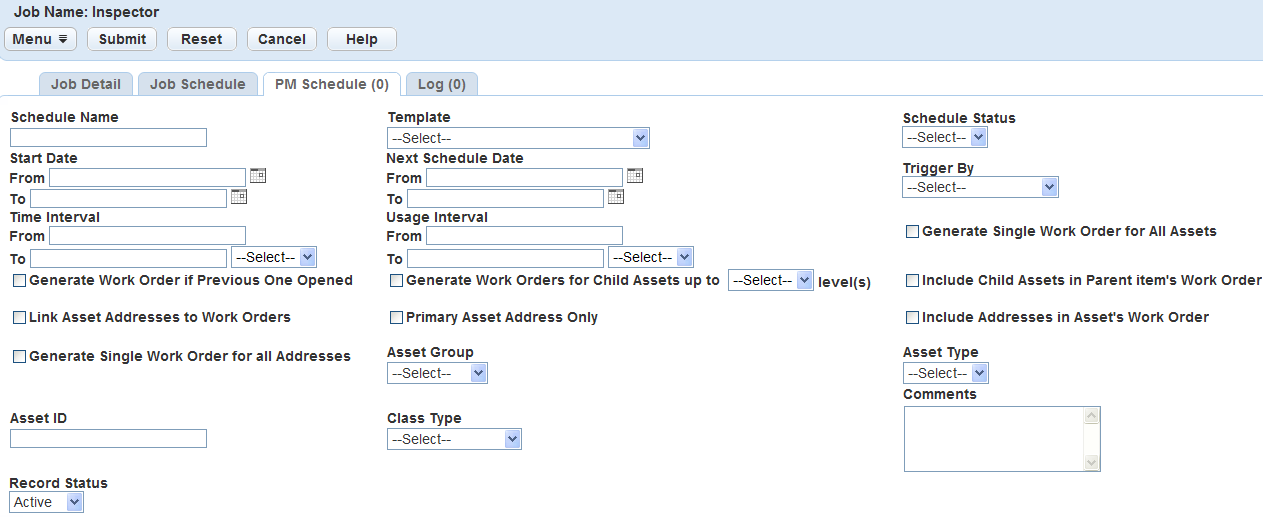
Complete the following search criteria as necessary:
Field Action Asset group Enter the Asset group code. Asset ID Enter the Asset ID of an asset that belongs to the asset type you are looking for. Asset type Enter the name of the asset type you are looking for. Comments Enter any comments associated with the maintenance schedule. Generate single work order for all addresses Select this option to create a work order for each asset address linked to this PM schedule. Otherwise, the PM schedule creates a single work order for all addresses. This option is not active if you select the Include addresses in asset’s work order option. Generate single work order for all assets Select this option to create a work order for each asset linked to this PM schedule. Otherwise, the PM schedule creates a single work order for all linked assets. Generate work orders for child assets up to n level(s) Select this option to create work orders for linked assets and their child assets up to three levels. Generate work order if previous one opened Select this option to allow the PM schedule to create a work order for an asset that has a previous work order still open. Include addresses in asset’s work order Select this option to include the addresses linked to the PM schedule in asset work orders created by the schedule. Include child assets in parent item’s work order This option becomes active when you check the Generate work orders for child assets up to n level(s) box. Select this option to create one work order for a parent asset and its child assets. Otherwise, each child asset receives a work order. Link asset addresses to work orders Check this box to show an asset’s addresses in work orders created for that asset. Primary only This option becomes active when you check the Link asset addresses to work orders box. Check this box to show only an asset’s primary address in work orders generated by this PM schedule. Record status Select the status of the record. Schedule name Enter a unique name to identify the schedule. Schedule status Use this list to select the status of the scheduled maintenance, such as, Active or Expired.
The status controls whether or not the maintenance schedule executes a work order. If the status is active, Civic Platform generates a work order. If the schedule's status is not active, Civic Platform does not execute a work order after the expiration date.
Template Select the name of the work order template used for the schedule. Time interval Enter the number of days/weeks/months/years between work orders generated for scheduled maintenance tasks. Trigger by Enter the date you used as the basis of the next maintenance due date. You can set this field to the Opened date, Scheduled date, or Completed date of the last PM work order. Trigger date Enter the first date that the scheduled maintenance is due. Usage interval
Enter the usage interval between scheduled maintenance activities, such as the number of miles or runtime hours.
Note: If you specify a usage interval, Civic Platform checks the usage interval prior to the time interval. If you did not enter a usage interval, Civic Platform generates work orders based on the time interval only. -
Select Submit.
-
Select the check box next to the PM Schedule(s) you want to add to the batch job.
Note: You should select only active PM schedules that you have not already assigned to the batch job. Otherwise, an error message displays. -
Select Select.
-
-
Define the job schedule as follows:
-
Select the Job schedule tab.
-
Complete the following fields:
Field name Action Start time Determine the time of day at which the batch job begins running by selecting hour, minute, and am/pm from menus.
Note: If you set a batch job Schedule status to Active but do not specify a Start Time, an error message displays when you try to save the batch job.Schedule status Use this menu to turn a batch job on and off. Select Active to activate the batch job. Select On hold to deactivate the batch job and save its information. Start date Enter the date on which the batch job starts or select a date by selecting the data picker beside the field.
Note: If you set a batch job Schedule status to Active but do not specify a Start date, an error message displays when you try to save the batch job.Time out (seconds) Enter the number of seconds a batch job attempts to run before timing out. End date This field is active only if you select a value other than Once in the Frequency field. Enter the date on which the batch job stops running or select a date by selecting the data picker  beside the field.
Frequency Select the frequency with which the batch job runs from this menu. The options are Once, Daily, Weekly, Monthly, or Yearly. PM generate (Required) This field enables you to specify how far in advance the batch job generates work orders.
Note: This field only displays if you selected PM schedule as the Service category during the creation of the batch job.Enter a number in the first field, then select Days, Weeks, Months, or Years from the menu in the second field.
Example: To generate work orders two weeks in advance of the PM Schedule batch job, enter 2 in the numeric field and select Weeks from the menu. Or, enter 15 in the numeric field and select Days from the menu. -
Select Save.
 See also
-