Features requiring interface implementations
Several features in Citizen Access include implementing interfaces. This appendix explains some of these features and provides implementation examples for them. The features require the Accela Services Implementation staff or IT agency administrators to provide the programming based on your agency’s need so that the feature works for your agency.
This appendix does not list all features that require interface implementations in Access Citizen Access. Accela provides SDK packages for features like the ePayment and XAPO integrations that require relatively complex configurations. You can find the SDK guides and zip files on Success Community.
Globally disable unwanted actions
You can globally disable unwanted actions listed in by implementing the interface IGrantPermission. All the links and buttons that relate to the action are removed or disabled throughout Citizen Access. The feature is useful when your agency does not want certain action available for public users in Citizen Access. For example, if your agency does not implement online payment processing, you disable the Fee payment action globally so that the citizens cannot go into the pay fees page during the application process because your agency does not offer a way to pay money due over the internet.
This action control works on a global level, which means when you disable an action, all the links and buttons specific for the action, regardless of in which module, page, or section, are hidden or disabled across Citizen Access. You can prevent some or all public users from performing the disabled action. For permission control on user groups in certain modules for certain objects, refer to the corresponding sections in this guide.
The table below lists the actions that you can disable globally.
| Action | Description |
|---|---|
|
Create record |
It is for public users to create permits or licenses. |
|
Renew record |
It is for licensed professionals to renew their licenses to keep the licenses current. |
|
Obtain fee estimate |
It is for fee estimation. Public users employ it to display a calculated estimate of fees relating to record type online. |
|
Fee payment (including Check out, Pay fee, Pay fee due) |
It is for public users to pay fees for the fee items associated with a business license or a building permit. When you disable the Fee payment action, the Check out button and the Pay fee and Pay fee due links are disabled or removed. |
|
Schedule inspection (including Request, Reschedule, Cancel inspection) |
It is for public users to schedule inspection for the record. When you disable the Schedule inspection action, you also disable the Reschedule inspection and Cancel inspection actions. |
|
Attach document |
It is for public users to upload document to record. |
|
Copy record |
It is for public users to clone an existing record to create a new record of the same record type. |
|
Create amendment |
It is for public users to create amendment record in the Citizen Access flow process. An amendment record is a child record of the parent record and inherits some information from the parent record for processing. |
Interface and class
The following lists interface and class that you use to disable unwanted actions.
IGrantPermisison. Interface that you must implement to disable the unwanted actions.
UserContext. Class that provides the current login user information. It contains the following properties.
-
LoginName: login name that the registered user uses to access Citizen Access.
-
CallerID: Login user’s ID assigned when registered.
-
FirstName: The first name of the login user.
-
MiddleName: The middle name of the login user.
-
LastName: The last name of the login user.
-
Permission: IDictionary<FunctionItem, bool>: It is used to set the disabled actions. Define the FunctionItem as Enumeration type.
The following diagram illustrates the relation between the interface and the class.

Implement IGrantPermission interface
To implement the IGrantPermission interface:
-
Create a project and add the Accela.ACA.CustomizedAPI.dll file from the bin folder under the ACA deployment directory to the project as reference.
-
Declare a class that implements the IGrantPermission interface.
-
Define unwanted actions by setting UserContext.Permission inside the GrantPermission method in the class.
-
Compile the program to generate one or more dll files.
-
Copy the dll files to the \Customize\DLL folder and the \bin folder under the ACA deployment directory.
-
Add the following configuration node to the CustomizedMapping.config file under the \Customize\Mapping folder under the Citizen Accessdeployment directory by following the syntax below.
<object id=”IGrantPermission” type=”namespace, assembly” singleton=”true”></object>
namespace: namespace under which you create the class, and plus the class name.
assembly: name of the .dll file that contains the class that implement the interface IGrantPermission.
Example of implementing IGrantPermission interface
Below is an example of how to globally disable unwanted action by implementing IGrantPermission.
Intention:
Disable the Schedule Inspection action when anonymous users navigate in Citizen Access.
Assumption:
Citizen Access sits in \\aa-server\aca-product.
Use .NET Framework to develop the program.
Steps of implementation:
-
Create a project with .NET Framework.
-
Locate the Accela.ACA.CustomizedAPI.dll file from the \\aa-server\aca-product\bin folder, and add it to the project as reference.
-
To find the Accela.ACA.CustomizedAPI.dll file:
-
Navigate to the FTP site.
-
Select the most recent Citizen Access installer.
-
Open it with a 7-zip.
OR
-
Run through a mock install and grab the file.
-
-
-
Declare a class “CustomizedPermission” to implement the IGrantPermission interface. Below is the sample code:
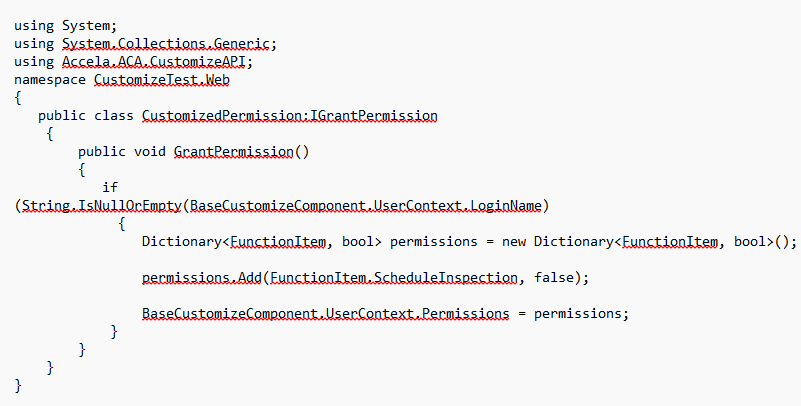
-
Compile the class and generate a dll file DisableActionSample.dll.
-
Copy the DisableActionSample.dll file in to the \\aa-server\aca-product\Customize\DLL folder and to the \\aa-server\aca-product\bin folder.
-
Add the following configuration node to the CustomizedMapping.config file located in \\aa-server\aca-product\Customize\Mapping folder.
<object id=”IGrantPermission” type=”CustomizeTest.Web.CustomizedPermission, DisableActionSample” singleton=”true”></object>
Implement custom component
You can create a custom component to contain your agency’s own information displaying to public users specially, by implementing the interface ICustomizedComponent. For example, you customize a component to include your agency logo, announcements, legal information, and web links.
Custom components can be nested. A custom component can contain another custom component as its sub-component, which in turn can contain sub-sub-component. The custom component displays in the application intake form and the home pages, including the Welcome global page and the Welcome registered page. Custom components require configurations in Access Citizen Setup to load the custom contents to the web pages when public users access these pages. For an example on how to create a custom component and get your Citizen Access website running with the content, see .
When you implement the interface ICustomizedComponent to create a custom component, you can reference to the DLL file, ComponentService.dll, and call the APIs exposed by the DLL to get data from the Citizen Access database. For the complete list of APIs, see . For an example on how to create a custom component which gets data from the Citizen Access database, see .
To implement custom component on your ACA site
-
Create a component file by implementing interface ICustomizedComponent.
-
Complete configuration in Citizen Access setup.
-
To display the custom component on the home pages, customize the Welcome global page and the Welcome registered page.
-
To display the custom component in the application intake form, customize the page flow.
Interface and classes
The following lists interface and class that you use to create custom components.
ICustomizedComponent. Interface that you must implement to create custom components. It contains the following property and methods:
-
Children: List<ICustomizedComponent>: The property is used to collect sub-components.
-
Show(): Execute customized business logic while showing contents.
-
SaveBefore(): Execute customized business logic before saving. For example, do validation.
-
Save(): Execute customized business logic while saving data.
-
SaveAfter(): Execute customized business logic after saving.
-
SaveAndResumeBefore(): Execute customized business logic before saving the partial application. This is for application intake form use only.
-
SaveAndResume(): Execute customized business logic while saving the partial application. This is for application intake form use only.
-
SaveAndResumeAfter(): Execute customized business logic after saving the partial application. This is for application intake form use only.
Citizen Access provides a number of APIs in the ComponentService.dll file for data integration with the custom component. For the complete list of APIs, see .
ResultMessage. Class that contains two properties. The returned parameters of the methods listed above must be of this type that both Citizen Access and the class you are going to create for implementing the IcustomizedComponent interface can recognize.
-
IsSuccess: The invoked method returns a value, either “true” or “false”, for this property.
-
Message: If the IsSuccess is equal to “false”, an error message shows on Citizen Access pages, and meanwhile stop submitting.
UserContext. Class that provides the current login user information. It contains the following properties.
-
LoginName: login name that the registered user uses to access Citizen Access.
-
CallerID: Login user’s ID assigned when registered.
-
FirstName: The first name of the login user.
-
MiddleName: The middle name of the login user.
-
LastName: The last name of the login user.
Note: The personal information above are useful when you prevent only certain users from performing certain actions. -
Permission: IDictionary<FunctionItem, bool>: Best practice is that you do not set the permission to this property, instead, you set the permission by implementing IGrantPermission interface if necessary, and obtain the customized permission with this property. Define the FunctionItem as enumeration type.
BaseCustomizedComponent. The base class that must be inherited by creating a new class to add new custom component.
-
User:UserContext: Property that is of UserContext type.
The following diagram illustrates the relation between the interface and the classes.

Steps of implementing ICustomizedComponent interface
To implement the ICustomizedComponent interface
-
Create a project and add the Accela.ACA.CustomizedAPI.dll file from the bin folder under the Citizen Access deployment directory to the project as reference.
-
Declare a class that inherits the BaseCustomizedComponent Class that implements the ICustomizedComponent interface.
-
Create your own content, such as agency logo, announcement, legal information for the component in the ascx file.
-
Compile the program to generate one or more dll files.
-
Copy the dll files to the \Customize\DLL folder under the ACA deployment directory and \bin folder.
-
Copy the ascx file from the project to the \Customize\UserControls folder under the ACA deployment directory.
-
Add the ascx file name and the path to the web pages.
-
If to display the custom component on the home pages, customize the Welcome global page and the Welcome registered page.
-
If to display the custom component in the application intake form, customize the Customize page flow.
-
Example of implementing ICustomizedComponent interface
Below is an example of how to implement a custom component by implementing ICustomizedComponent interface.
Intention
Create a custom component and add it to both the Welcome global page and the Welcome registered page. The custom component contains a logo image, a paragraph of text, and a Schedule inspection link.
Assumption
Citizen Access sits on \\aa-server\aca-product.
Use .NET Framework to develop the program.
Prerequisite
Assuming that the Schedule inspection action - globally disabled for anonymous users - is implemented.
Steps of implementation
-
Create a project with .NET Framework.
-
Locate the Accela.ACA.CustomizedAPI.dll file from the \\aa-server\aca-product\bin folder, and add it to the project as reference.
-
Declare a class “CustomizedComponent” to inherits the BaseCustomizedComponent Class that implements the ICustomizedCompoent interface.
Below is the sample code:
using Accela.ACA.CustomizeAPI;namespace CustomizeTest.Web{ public class CustomizedComponent:BaseCustomizeComponent { protected override voic (OnLoad)(System.EventArgs e) { //The Schedule Inspection action - globally disabled for anonymous users - is implemented by implementing IGrantPermission interface. if (UserContext.Permision != null & UserContext.Permissions.ContainsKey(FunctionItem.ScheduleInspection) && UserContext.Permisisons[FunctionItem.ScheduleInspection]== false) { lnkScheduleInspection.Visible = false; }base.Onload(e);
} }}
-
Globally disable the Schedule Inspection action when anonymous users navigate Citizen Access.
-
Add information to the CustomizedComponent.ascx file.
<%@ Control Language="C#" AutoEventWireup="true" Inherits="CustomizeTest.Web.CustomizedComponent" %><div style="border: 1px solid gray; padding:5px;"> <div><!-- Add image --> <img src="Customize/en-US/images/header_logo.jpg" alt="Home" id="header_logo" style="border-width: 0px;"/> </div> <font style="font-size: 1.2em;">Welcome to the new Citizen Portal</font> <div><!-- Add text -->
<font style="color: #666666; font-size: 1.1em;"> We are pleased to offer our citizens, businesses, and visitors access to government services online, 24 hours a day, 7 days a week. </font> </div> <br /> <div> <!-- Add link --> <asp:HyperLink ID="lnkScheduleInspection" NavigateUrl="../../Cap/CapHome.aspx?IsToShowInspection=yes&module=Building&TabName=Building" Text="Schedule an Inspection" runat="server"></asp:HyperLink> </div></div>
-
Compile the class and generate a dll file CustomizedComponentSample.dll.
-
Copy the CustomizedComponentSample.dll file in to the \\aa-server\aca-product\Customize\DLL folder and the \\aa-server\aca-product\bin folder.
-
Copy the CustomizedComponent.ascx file in to the \\aa-server\aca-product\Customize\UserControls folder.
-
Configure the Welcome global page and the Welcome registered page to upload the component content on to the pages.
-
Navigate to Citizen Access setup > General > Page.
-
Open the Welcome global page and the Welcome registered page.
-
Scroll down to the bottom of the Welcome global page.
-
Citizen Access setup displays the Click here to edit customized content properties area.
-
Select the Click here to edit customized content properties area to highlight it.
-
Fill the Path value with CustomizedComponent.ascx.
-
Set the Visible value to True.
-
Select Save.
-
-
After configuration, the custom component applies to Citizen Access.
-
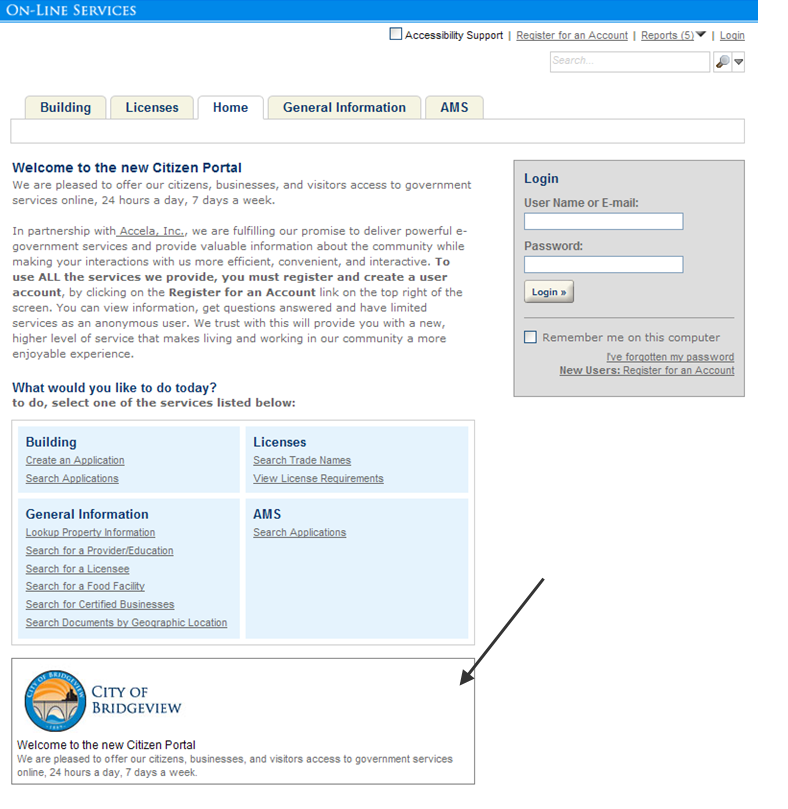
On the Citizen Access login (Welcome global) page, the custom component, without the Schedule an inspection link, displayed at the bottom of the page. Beware that all the Schedule links in the Link section above the custom component hide also, because Schedule inspection action only available for login users.
-
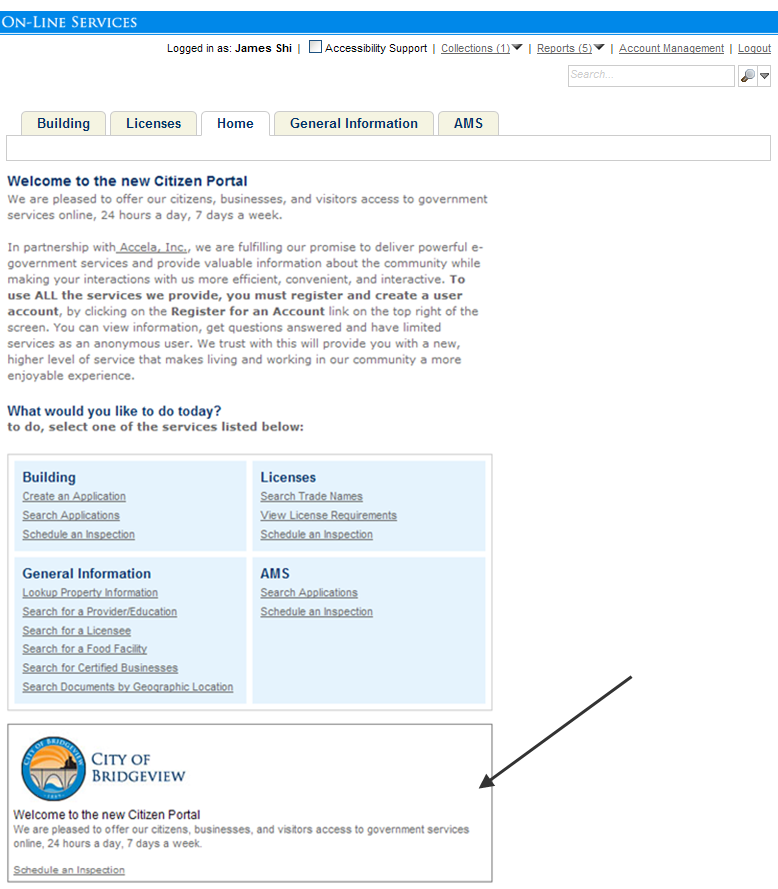
Log in to the Welcome registered page. The custom component displayed at the bottom of the Login page. All the schedule inspection links resume displaying in the Link section.
-
Example of creating a custom component that implements APIs
When you implement the interface ICustomizedComponent to create a custom component, you can reference to the new DLL file, ComponentService.dll, and call the APIs exposed by the DLL to get data from the Citizen Access database. For the complete list of APIs, see .
Below is an example of how to create a custom component “Dashboard” and add it to the Welcome global page on the Citizen Access website. The Dashboard component implements the CapService.GetMyRecords API to get the record list of the current user and display the fees and fines information extracted from the records.
To create a custom component with ComponentService.dll
-
Create a new project in Visual C# and name the project Dashboard.
-
Locate the required DLL files, ComponentService.dll and CustomizeAPI.dll, from the bin folder under the ACA deployment directory, and add them to the project as reference.
-
Create a web user control, and name it Dashboard.ascx.
-
Declare a class dashboard to inherit the BaseCustomizeComponent class in the Accela.ACA.CustomizeAPI namespace.
-
Implement the desired functions using the exposed APIs.
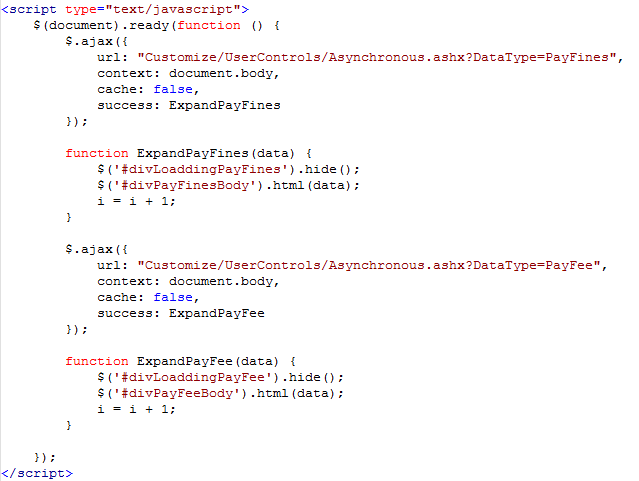
The following steps use jQuery to implement the function of the dashboard.
-
Create a “Handle” directory file in the dashboard project.
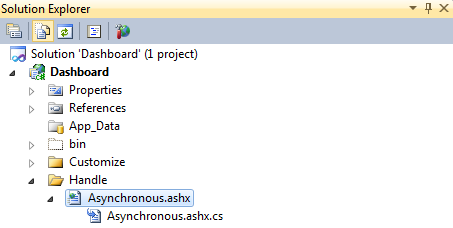
-
Create a handler file, for example, “Asynchronous.ashx” under the “Handle” directory.
-
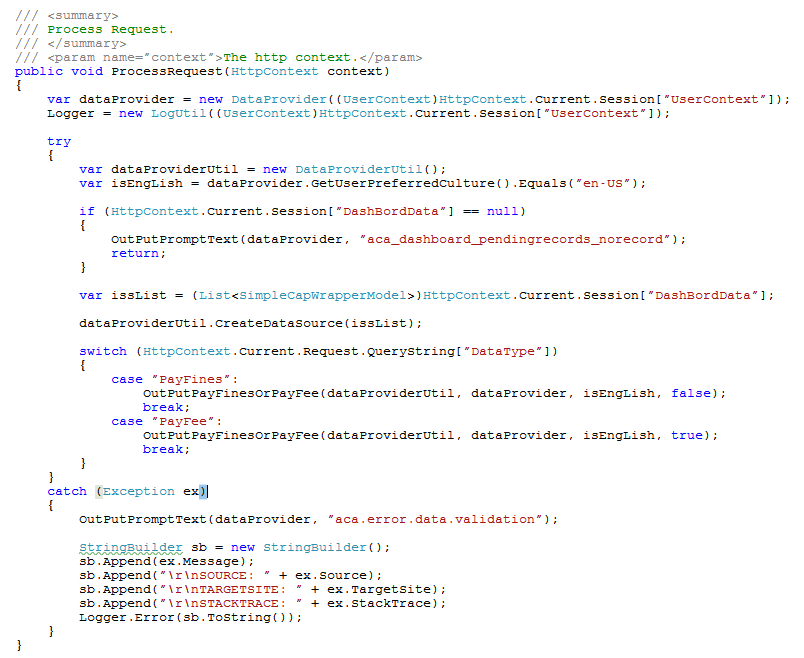
Locate the ProcessRequest method in Asynchronous.ashx.
-
Call the APIs in the ProcessRequest method for accessing the data in Citizen Access, for example, the data of paying fines and paying fees. Do the following.
-
Create a DataProvider class for calling the CapService.GetMyRecords API to get the records list of the current user.
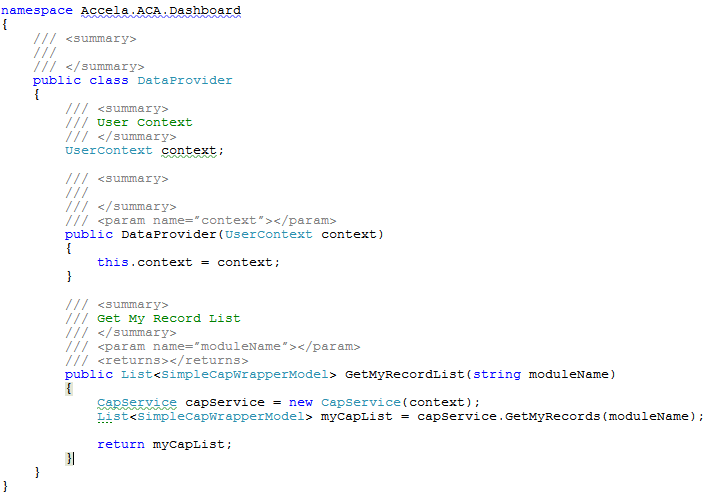
-
Load DataProvider in Dashboard.ascx.cs, and pass the records list to Session["DashBordData"].
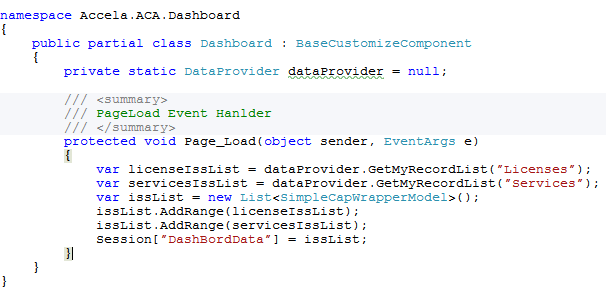
-
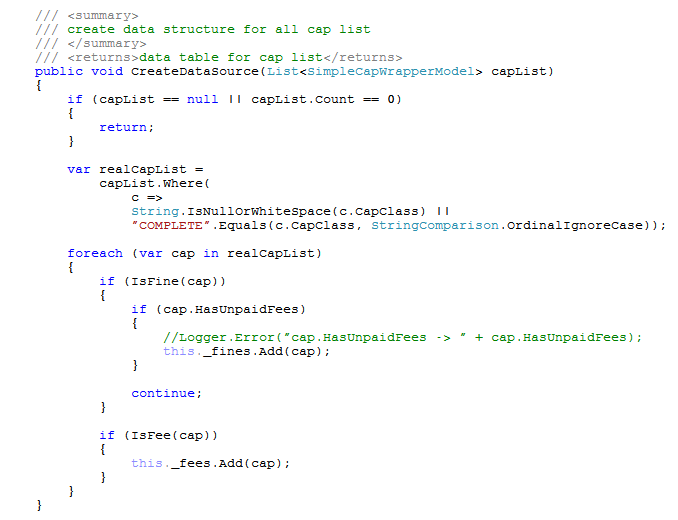
Add the code for getting the PayFines and PayFee data in Asynchronous.ashx.cs. Use the DataUtil class to filter the data.

-
Add a ready() method in the HTML file of Dashboard.ascx.
-
Compile the project and generate a DLL file dashboard.dll.
-
Copy the generated dashboard.dll to <ACA server path>\Web\Bin.
-
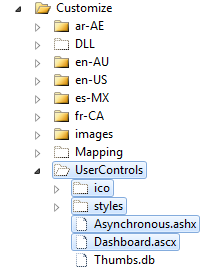
Copy Dashboard.ascx and Asynchronous.ashx and other related resource files to <ACA server path>\Web\Customize\UserControls.

-
-
-
Configure the Welcome Global page and the Welcome Registered page to upload the component content on to the pages.
-
Navigate to Citizen Access Setup > General > Page.
-
open the Welcome global page and the Welcome registered page.
-
Scroll down to the bottom of the Welcome global page.
-
Citizen AccessSetup displays the Click here to edit customized content properties area.
-
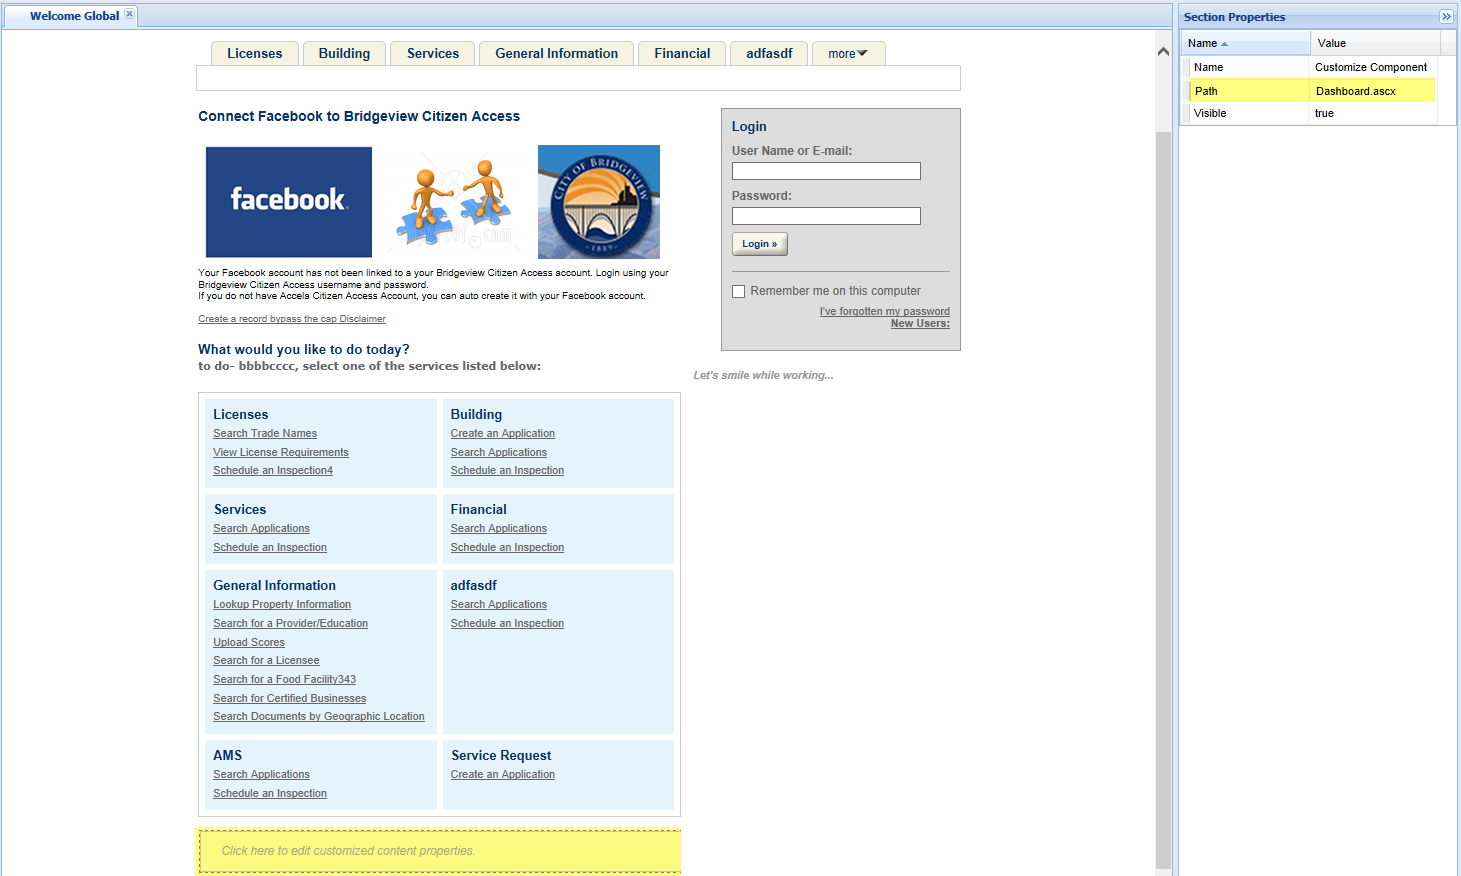
Select the Click here to edit customized content properties area to highlight it.
-
Fill the Path value with Dashboard.ascx.
-
Set the Visible value to True.
-
Select Save.
-
-
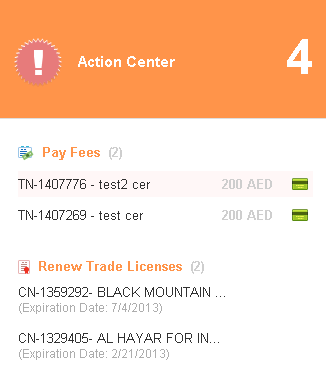
Log in to Citizen Access with a user account to check whether the custom component applies to the Welcome global page.
Note: The customized component area in the Welcome global page displays the dashboard which provides the pay fee and pay fines data.
| API class/API name | Description and example | |
|---|---|---|
|
CapService/GetMyRecords |
This API gets the records that belong to the specified module. Parameter (Name / Type / Required or Optional / Description): moduleName / string / Required / Specify module Returned Type: List<SimpleCapWrapperModel> Example API Call: CapService capService = new CapService(context); List<SimpleCapWrapperModel> myCapList = capService.GetMyRecords(moduleName); |
|
|
CapService/GetCapByAltID |
This API gets the record information per the specified record Alt ID. Parameter (Name / Type / Required or Optional / Description): capAltID / string / Required / Specify AltID sAgencyCode / string / Required / Specify AgencyCode Returned Type: CapWrapperModel Example API Call: CapService capService = new CapService(context); CapWrapperModel capModel = capService.GetCapByAltID("13ACC-000000254F","SACCO"); |
|
|
LabelService/GetLabelTextByKey |
This API gets the value of the specified label key. Parameter (Name / Type / Required or Optional / Description): labelKey / string / Required / LabelKey Returned Type: string Example API Call: LabelService labelService = new LabelService(context); return labelService.GetLabelTextByKey(key); |
|
|
FeeService/GetTotalBalanceAmount |
This API gets the total fee amount in the specified record. Parameter (Name / Type / Required or Optional / Description): agencyCode / string /Required / AgencyCode id1 / string / Required / CapId1 id2 / string / Required / CapId2 id3 / string / Required / CapId3 Returned Type: double Example API Call: FeeService feeService = new FeeService(context); return feeService.GetTotalBalanceAmount("SACCO","13ACC", "00000", "0254F"); |
|
|
I18NService/GetUserPreferredCulture |
This API gets the language used in the current website. Parameter (Name / Type / Required or Optional / Description): Null Returned Type: string Example API Call: I18NService i18nService = new I18NService(context); return i18nService.GetUserPreferredCulture(); |
|
|
LicenseProfessionalService/GetLicenseProfessionalList |
This API gets the licensed professional information of the specified record. Parameter (Name / Type / Required or Optional / Description): agencyCode / string /Required / AgencyCode id1 / string / Required / CapId1 id2 / string / Required / CapId2 id3 / string / Required / CapId3 Returned Type: List<LicenseProfessionalWrapperModel> Example API Call: LicenseProfessionalService licenseProfessionalService = new LicenseProfessionalService(context); return LicenseProfessionalService.GetLicenseProfessionalList("SACCO","13ACC", "00000", "0254F"); |
|
|
LogService/Debug |
This API writes the debug log to the server. Parameter (Name / Type / Required or Optional / Description): tag / string / Required / Action trigger message / object / Required / Log content Returned Type: void Example API Call: LogService logService = new LogService(userContext); logService.Debug("Dashboard", message); |
|
|
LogService/Error |
This API writes the error log to the server. Parameter (Name / Type / Required or Optional / Description): tag / string / Required / Action trigger message / object / Required / Log content Returned Type: void Example API Call: LogService logService = new LogService(userContext); logService.Error("Dashboard", message); |
|
|
LogService/Info |
This API writes the info log to the server. Parameter (Name / Type / Required or Optional / Description): tag / string / Required / Action trigger message / object / Required / Log content Returned Type: void Example API Call: LogService logService = new LogService(userContext); logService.Info("Dashboard", message); |
|
|
LogService/Fatal |
This API writes the fatal log to the server. Parameter (Name / Type / Required or Optional / Description): tag / string / Required / Action trigger message / object / Required / Log content Returned Type: void Example API Call: LogService logService = new LogService(userContext); logService.Fatal("Dashboard", message); |
|
|
WorkflowService/GetWorkflowTasks |
This API gets the task names in the specified record. Parameter (Name / Type / Required or Optional / Description): paddingCaps / List<SimpleCapWrapperModel> / Required / To-be-searched Cap set Returned Type: string[] Example API Call: var workflowService = new WorkflowService(context); string[] workFlowTasks = workflowService.GetWorkflowTasks(paddingCaps); |
|
|
WorkflowService/ConcatStringWithSplitChar |
This API concatenates specified strings. Parameter (Name / Type / Required or Optional / Description): args / IEnumerable<string> /Required/ To-be-assembled data set splitChar / string / Required / Field separator Returned Type: string Example API Call: eg: If args[0] = "a",args[1]="b",args[2]="c", the result is "a b c"; If args[0] = "",args[1]="b",args[2]="c", the result is "b c"; |
|
|
ASITDrillDownService/GetASITUITableFromCurSession |
This API gets the ASI table information with the specified table key in the records that belong to the specified module. Parameter (Name / Type / Required or Optional / Description): sTableKey / string / Required / Table Key sModuleName / string / Required / Module Name Returned Type: ASITWrapperModel Example API Call: ASITWrapperModel asitWrapperModel = ASITDrillDownService.GetASITUITableFromCurSession("sTableKey","sModuleName"); |
|
|
ASITDrillDownService/GetFirstDrillDownListOfASIT |
This API gets the first-level drilldown information in the specified ASI table group and subgroup of the specified agency. Parameter (Name / Type / Required or Optional / Description): sAgencyCode / string / Required / AgencyCode sASITGroupName / string / Required / GroupName sASITSubGroupName / string / Required / SubGroupName Returned Type: DrillDownSeriesWrapperModel Example API Call: ASITDrillDownService asitDrillDownServicel = new ASITDrillDownService(userContext) DrillDownSeriesWrapperModel aSWS = asitDrillDownServicel.GetFirstDrillDownListOfASIT(agencyCode, parentGroupName, subGroupName); |
|
|
ASITDrillDownService/GetNextDrillDownListOfASIT |
This API gets the next-level drilldown information in the specified ASI table group and subgroup of the specified agency. Parameter (Name / Type / Required or Optional / Description): sAgencyCode / string / Required /Agency Code selectedIdsOfLastDrillDown /string[] / Required / To-be-got column sSeriesId /string / Required /Specify series Returned Type: DrillDownSeriesWrapperModel Example API Call: ASITDrillDownService asitDrillDownServicel = new ASITDrillDownService(userContext) DrillDownSeriesWrapperModel aSWS = asitDrillDownServicel.GetNextDrillDownListOfASIT(agencyCode, (string[])columnIDPathList.ToArray(typeof(string)), seriesId); |
|
|
ASITDrillDownService/SearchDrillDownItem |
This API searches for drilldown information according to the specified criteria. Parameter (Name / Type / Required or Optional / Description): sAgencyCode /string / Required / Agency Code sASITGroupName /string / Required / ASIT Group Name sASITSubGroupName / string / Required / ASIT Sub Group Name sSearchValue /string / Required / Search Content Returned Type: List<DrillDownItemWrapperModel> Example API Call: ASITDrillDownService asitDrillDownServicel = new ASITDrillDownService(userContext) List<DrillDownItemWrapperModel> lst = asitDrillDownServicel .SearchDrillDownItem("SACCO","GroupName","SubGroupName","Search Content"); |
|
|
ASITDrillDownService/UpdateSelectedDrillDown |
This API updates the specified ASI table drilldown item. Parameter (Name / Type / Required or Optional / Description): finalColumnNames / Dictionary<string, int> / Required / selectIdList / List<string[]> / Required / sGroupName / string / Required / sSubGroupName / string / Required / asitUIKey /string[] / Required / Returned Type: bool. true: success; false: failed Example API Call: ASITDrillDownService asitDrillDownServicel = new ASITDrillDownService(userContext) bool result = asitDrillDownServicel .UpdateSelectedDrillDown("finalColumnNames","selectIdList","sGroupName","sSubGroupName","asitUIKey"); |
|
|
ASITDrillDownService/BuildSuccessfullyAddASITRowScript |
If an ASI table has several sub tables, when users add a row into a sub table with drill down, this API builds the script to be called at users’ click of the Finish button, for refreshing the correct sub table in the ASI table. Parameter (Name / Type / Required or Optional / Description): Null Returned Type: StringBuilder Example API Call: ASITDrillDownService asitDrillDownServicel = new ASITDrillDownService(userContext) StringBuilder sb = asitDrillDownServicel .BuildSuccessfullyAddASITRowScript(); |
|
|
ASITDrillDownService/GetASIT_POSTEVENT_SYNCUICOPYDATA |
This API gets the constant ASIT_POSTEVENT_SYNCUICOPYDATA from Citizen Access. Parameter (Name / Type / Required or Optional / Description): dataType / UIDataType / Required / Data Type dataKey / string[] / Required / Data Key Returned Type: UITable[] Example API Call: ASITDrillDownService asitDrillDownServicel = new ASITDrillDownService(userContext) UITable[] arrUI = asitDrillDownServicel .GetASIT_POSTEVENT_SYNCUICOPYDATA("dataType","dataKey") |
|