Variations for creating records
This appendix explains the different methods to process record creation. The creation of records is one of the basic functions governing how your agency does business with your customers. Citizen Access provides a default method for creating records. You can modify the default record creation process to accommodate the demands of agencies to create records that have child records, agencies that implement processes for multiple agencies, or agencies that create amendment records. Citizen Access also provides the copy record functionality for public users to create new record by copying an existing record. You can use the default record creation process to create records without child records, you can also modify the process to allow users to create child records during parent record creation. You can clone an existing record to create a new record.
This appendix explains how to modify a default record creation process to be a parent-child record creation process, how to copy an existing record to create a new record. This appendix also provides an overview of the multiple agency record creation process and the creation of an amendment record.
Create a parent-child record
You can modify a default record creation process, which does not involve child records, to be a parent-child record creation process. The parent-child record creation process requires public users to create at least one child record during parent record creation. Child records work as part of the application contents to the parent record.
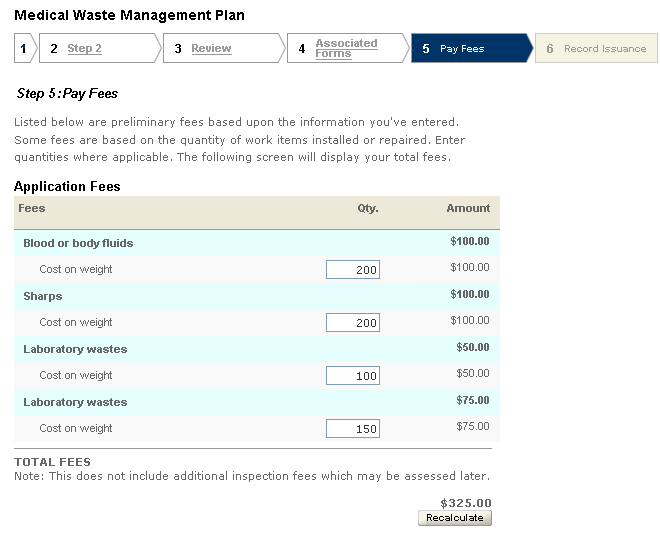
The parent-child record creation is useful if users want to complete a task which comprises several sub-tasks, for example, a clinic applies for a permit to throw away their medical wastes, such as blood or surgical specimens. In this example, the parent record is the application to throw away the medical wastes, while the child records are the specific contents of the medical wastes to be thrown away, such as blood and surgical specimens.
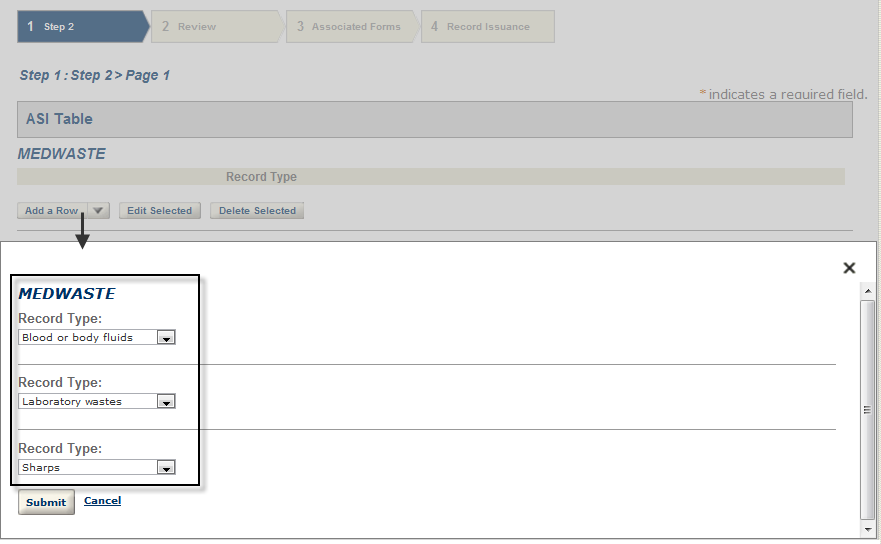
In the parent-child record creation process, public users can select child record types from the ASI Table section. When users move to the Associated form step, EMSE scripts automatically generate child records and display them in the Associated Form step.
To set up the parent-child record creation process, in addition to completing the configurations described in , you must also complete several other configurations as described below.
-
To implement creation of parent-child records
-
Complete all the configurations described in .
-
Make sure you mark the Enable Associated Forms option in the record type setting in Civic Platform.
-
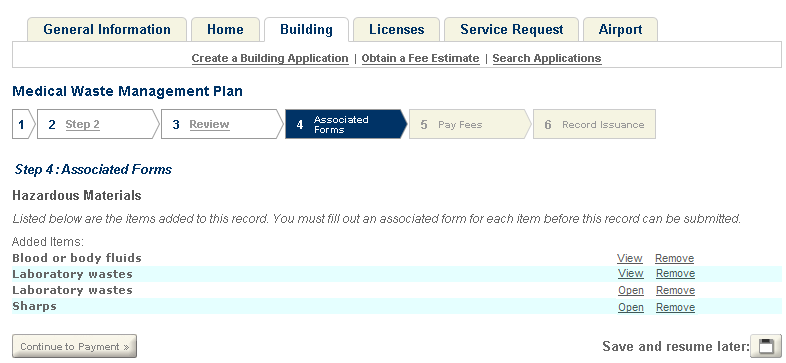
In the Associated Forms step, users must complete creation of all child records before moving forward to the next step, Pay Fees.
Citizen Access adds the Associated forms step to the parent application creation process to display the child records.
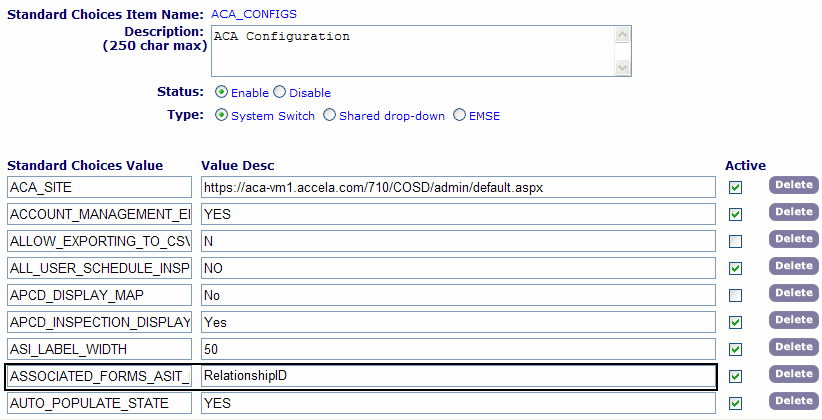
Add the following value and value description to the standard choice ACA_CONFIGS. For more information on configuring the standard choice, refer to the Accela Civic PlatformConfiguration Reference.
| Standard choice value | Value desc |
|---|---|
| ASSOCIATED_FORMS_ASIT_RELATIONSHIP_FIELD |
RelationshipID The Value Desc is used in the ASI table in the next step. |
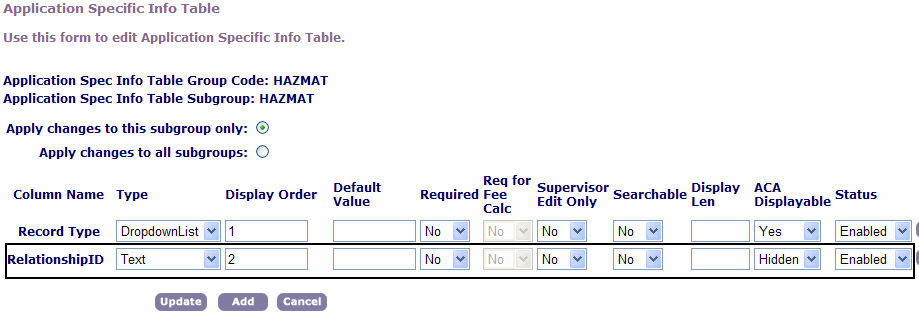
Create an ASI table and configure it as described in the following substeps.
-
Create a column and enter the column came to match the Value desc of the standard choice value you just created.
-
Set the Type to Text and set the ACA Displayable to Hidden.
-
The column is used to store the child record IDs that are hidden from users when users move to the Associated forms step in the parent record creation process.
-
Create another column. Set the Type to Drop-down list. Add the necessary existing record types to the drop-down list, or import the record types from other existing shared drop-down lists.
-
Citizen Access displays the ASI table section during the record creation process. Users select the Add rows button and select the child record types on the pop-up window.
-
Associate the ASI table to the parent record type.
For more information on ASI tables, see “Working with ASI Tables” section in the “Working with Application Specific Information” chapter in the Accela Civic Platform Administrator Guide. -
Add the component of ASI table to the page flow of the parent record type to display the ASI Table section in the record creation process.
-
Define an EMSE script.
-
You must define a script and associate it to the ApplicationSubmitAfter event to auto-generate the child records based on the selected child record types as users move to the Associated Forms step in the parent record creation process. For information on writing scripts, see the “Event and Script Setup” chapter in the Accela Civic Platform Scripting Guide.
-
Enable Shopping cart in the Global settings page in the Citizen Access Administration site.
-
Select the Enable cart option.
-
Set the Payment transaction setting to the Transaction per cart mode.
-
Citizen Access lists all the fees of the parent record or the child records in the Pay fees page.
Copy an existing record
Public users can clone an existing (parent) record to create a new record of the same record type on pages, such as the Record detail page, the Receipt page, the record list, and the record search list. When public users clone a record, they specify the source record content they want to use to populate the new record. The selected source content is populated in the corresponding sections of the application intake form. After selecting the desired source content, public users must go through the record creation process to modify the populated information as needed, fill any blank fields, and complete the new record creation.
For Citizen Access that supports multi-agency services, when public users copy a record for a sub-agency, if the sub-agency does not have any page flow associated with the record type, public users create the cloned record with the main agency’s page flow that is used for creating the parent record. If sub-agency has its own page flow associated with the record type, public users create the cloned record based on the sub-agency’s page flow.
Copy record
Follow the task list below to implement the Copy Record functionality
Enable Copy Record functionality. See .
Customize the web page, Copy Record, in the Apply for a Permit folder. For instructions on configuring a web page, see .
Creating Records for Multiple Agencies
This section explains the details of record creation when multiple agencies offer services to public users through ACA. When Civic Platform is in a multi-agency configuration, your agency requires the implementation of ACA. This appendix provides the basic conceptual flow for the process to create a record, the configurations for setup, and the impact of configurations on the user interface. This special way to create records is particularly useful if a main agency (State) wants to establish themselves as a hub for sub-agency (County or City) information where their customers can have access to view or perform tasks associated with any of the sub-agency levels. This allows public users to manage records from the multiple agencies from a single login. For example, a business owner’s building permit can be accessible with one ACA login where services associated with the city, county, and state are tracked and applied to their application. The services may include maintenance with waterlines or structural upgrades.
To set up the record creation process, your must perform multiple configurations within Civic Platform and Citizen Access. Follow the steps in for a complete list of configurations.
You must perform all configurations in this appendix for a successful record creation process. The configurations enable agencies to share information in a common database and allow public users access to records from multiple agencies in one location.
Understanding the Process for Creating a Record
When a public user creates a record involving multiple-agencies in ACA, they move through a series of processes before completion. These next few paragraphs explain the steps that the public user takes during record creation and the Civic Platform responses. Refer to for a diagram. This methodology is required for record creation involving multiple agencies services from a single ACA site. This process can, however, be implemented with an individual agency unaffiliated with other locations.
Diagram of the Process of Creating Records

Citizen Access provides the public user with an interface to create a record online. A public user goes to the agency website and logs in to ACA to access the ACA Home Page. There are two hyperlinks for users to start the record creation process:
“Create an Application” hyperlink
When clicked, this hyperlink directs users to select a work location which an address search across multiple agencies can obtain. When the address is selected, Civic Platform fires an EMSE (Event Manager and Script Engine) script to filter the available services based on the address type and license type. The Select Services section lists all the service options by agencies. The public user can select one or more available services from the list. See .
Service Options available by Work Location

“Create an Application by Selecting Services” hyperlink
When clicked, this hyperlink directs users to select one or more services across multiple agencies. See . The Select Services section lists all the service options by agencies, which include all the services that do not relate to any license types, and the services (if any) that are associated with the license type(s) of the public user.
Service Options available by Agencies

If users select multiple services, or select a service whose record type does not relate to any page flow, users must select a record type before starting the application creation process.
The public user follows the page flow to complete and confirms the application for submission. At this point the public user may continue on to view the estimation of fees for the records. See .
Civic Platform is configurable to validate any license information through EMSE at this point. After validation, the public user makes a full or partial payment. The issuance and confirmation of payment displays. Once a sub-agency record is paid in full, it is disassociated from the main placeholder record type. When all records are paid in full, the main placeholder record type is removed and each sub-agency record stands alone at the associated sub-agency level ending the record creation process.
A public user views all of the records that are associated with him across multiple agencies in the My Record list. He can also search records across multiple agencies. The search results also displays all associated records across multiple agencies.
Configurations for Record Creation and the Impact on the User Interface
The configurations required to implement the creation of records offered for multiple agencies and their services include features associated with multi-agency services, sub-agency record types, and reports. Each of these features may require Standard Choice and/or Functional Identification (FID) configurations. The most critical element of the process is the main record type which works as a place holder for sub-agency records and resides at the main agency level. The place holder record type does not require ASI (application-specific information), workflow, or fee setup because it merely functions as a storage place. You must configure a page flow for the place holder record type. You must also configure the record type filter in Citizen Access so that this main record type is the only available record type available to public users. This forces the public user to initially select the place holder record type so the record types for the sub-agency services can be associated with it moving the group of records together through the record creation process. The instructions below provide the configurations for the record creation feature and their impact on the user interface.
To configure the ability to create records
Configure any delegate users to have the ability to manage multiple agencies and their services. Enable this feature for public users so that they have access to multiple agency services when creating a record online. For complete configuration information, refer to .
Configure the ability for multiple agencies to share information in a common database. This is particularly useful when you search for addresses across multiple agencies when selecting a work location. For complete configuration information, refer to .
Enter the official website URL on the Global Settings page. For complete configuration information, refer to in the .
Configure the multi-service functionality for multiple agencies. This includes the configuration for the items listed below:
Configure a record type at the main agency level. This record type does not require Application Specific Information (ASI), workflow, or fee setup.
Configure any record types at the sub-agency level.
Configure ASI groups for sub-agency services. For example, ASI group plumbing services with sub-group water heater. For more examples, refer to .
|
You must define the ASI sub-group at both the parent and sub-agency level and make sure they match. At the parent level the ASI sub-group information must exist in the database but it does not need to relate to a record type. |
Set up the multi-agency services and associate them to record types, licensed professionals, addresses. You may also configure the service locks. For basic configuration information refer to .
Associate any logos with an agency. See . For complete configuration information, refer to .
Configure the record creation task on the Citizen Access home page.
For multiple agencies, mark the “Create an Application” modular task, or an equivalent task such as “Apply for a Permit” in the Feature Settings page of the agency administration site.
For the main agency, mark the “Create an Application by Selecting Services” modular task in the Feature Settings page of the agency administration site.
For configuration information, see . For viewing the pages after users select the task, see and .
Receipt and permit summary configurations.
Configure the receipt and permit summary in Report Manager. You must define receipts for each sub-agency and main agency. You must also define an overall multi-agency receipt that includes all sub-agency information at the main agency level. You can refer to .
Associate the receipts and the permit summary to buttons in Citizen Access. For complete configuration information, see .

Configure the page-flow for the main agency placeholder record type. For complete configuration information, see .
Configure the record type filter to exclude all records but the main agency placeholder record type. For complete configuration information, refer to .
According to your agency’s requirement, enable or disable the associated forms for a main agency. For complete configuration information, see .
Sharing Information between Agencies
Civic Platform provides a way for multiple agencies to share address, parcel, owner, licensed professional, and contact information. Consolidating APO, licensed professional, and contact information allows users to perform searches or update information across agencies. It also limits duplicate information in various agency databases. For complete information about how to consolidate licensed professionals, see .
Topics
Sharing Addresses, Parcels, and Owners (APO)
This feature is required for the implementation of creating records for multiple agencies. During the record creation process, a public user searches and selects a work location based on addresses available in the common database.
For example, two agencies in Oregon, Sandy and Portland, want to share their data with an administrator and the public user group from the State of Oregon. Each city grants user access to their agency data through both FID configuration and delegate user setup to allows users to search addresses across these agencies. Depending on the users’ privileges and settings, they can view and edit the other agencies data. The user and agency that created the APO record is preserved. For more information about granting user access to a common database, refer to .
The sharing APO information feature requires Standard Choices configuration. You must set the APO_CHECK_DUPLICATE Standard Choice to control the agency data filter and the MULTI_SERVICE_SETTINGS Standard Choice to control the ability to delegate users to work across agencies.
For complete information on how to set up Standard Choices, refer to the Accela Civic Platform Configuration Reference.
To enable the sharing of APO information across agencies
Navigate to Civic Platform > Admin Tools > Agency Profile > Standard Choices.
Configure the Standard Choice APO_CHECK_DUPLICATE as described below:
|
Type |
Select the System Switch option. |
|
Standard Choice Value |
Y or N. Set the configuration for Yes if you want to expand search functionality by checking the address against additional fields for duplicate information. Set the value to No to use existing search logic. |
Configure the Standard Choice MULTI_SERVICE_SETTINGS as described below:
|
Type |
Select the System Switch option. |
|
Standard Choice Value |
IS_SUPER_AGENCY |
|
Value Desc |
Yes or No. |
In a multiple-agency environment, you can share contacts across agencies. When a public user adds or updates a contact from the main agency or the sub-agency, Citizen Access can synchronize contact information across all agencies in the multiple-agency environment. The shared contact information includes basic contact information, contact template data, contact addresses, contact aliases, and contact association with public users.
Contact templates relate to contact types. If agencies have associated different contact templates for the same contact type, Citizen Access synchronizes only the template fields with the same field labels between the agencies. For example, Main Agency, Sub-Agency 1, and Sub-Agency 2 have defined the template fields for the contact type “Applicant” as shown in the . When Main Agency adds an applicant, the applicant’s information including the template fields is available in both sub-agencies. However, Sub-Agency 2 does not display the applicant’s ethnicity. Similarly, when Sub-Agency 2 adds an applicant, the applicant is available in both Main Agency and Sub-Agency 1 but those two agencies do not have the applicant’s ethnicity information.
|
Main Agency |
Sub-Agency 1 |
Sub-Agency 2 |
|
Gender |
Gender |
Gender |
|
Language |
Language |
Language |
|
Ethnicity |
Ethnicity |
|
The sharing contacts feature requires Standard Choices configuration. Each agency must configure the Standard Choice CONTACT_ACROSS_AGENCIES in the same way. For complete information on how to set up a Standard Choice, refer to the Accela Civic Platform Configuration Reference.
To enable the sharing of contacts across agencies
Navigate to Civic Platform > Admin Tools > Agency Profile > Standard Choices.
Configure the Standard Choice CONTACT_ACROSS_AGENCIES for the main agency and each of the sub-agencies as follows:
|
Type |
Select the System Switch option. |
|
Standard Choice Value |
Enter the agency codes of the agencies between which you want to share contacts. Super administrator defines the agency codes during agency creation. To find correct agency codes, see “Maintaining Agencies” in the Agencies and Functions chapter of the Civic Platform On-Premise Administrator Supplement. |
Enabling Associated Forms for a Main Agency
The multiple-agency environment supports the associated forms functionality. This allows a public user to complete multiple applications at a time.
When the public user selects multiple services to create applications in the main agency, Citizen Access uses the main agency’s placeholder record type as a parent record type to collect common information and Citizen Access uses the selected services’ record types as child record types to collect service-specific information. The common information is later copied into each child record. To enable associated forms functionality, follow the instructions in this section.
When the public user selects a single service to create applications in the main agency, the associated forms functionality works in the same way as that in a regular agency. Citizen Access uses the service’s record type as a parent record type and requires the user to specify the child record types in the ASI Table section. For complete configuration information about enabling the associated forms functionality in a regular agency, see .
The Associated Forms step lists all the child record types during application intake process. Depending on the record type settings on the parent record type, the public user can open and complete all or some of the child records before moving forward to the next step. If necessary, the user can remove any of the child records from the Associated Forms list.
To enable the associated forms functionality for a main agency
Make sure you associate each of the parent record types and child record types to a page flow. For complete configuration information, see .
Make sure you mark the Enable Associated Forms option for the parent record type in the record type setting in Civic Platform. See.

Citizen Access adds the Associated Forms step to the parent application creation process to display the child records.

If necessary, mark or clear the Enable Partial Submission option for the parent record type in the record type setting. This option is nested under the Enable Associated Forms option.
If you mark the Enable Partial Submission option, Citizen Access allows public users to move forward to the next step without completing creation of all child records. For example, the Continue to Payment button in the screenshot for becomes accessible.
If your clear the Enable Partial Submission option, Citizen Access requires public users to open and complete each child record before moving forward to the next step.
Civic Platform allows users to perform operations in multiple agencies using one user account. A user granted access to multiple agencies can log in to Civic Platform and easily switch between agencies to perform tasks or view information. This feature is implemented in ACA for creating records for multiple agencies. This provides a way for a public user to have access to search information and view information shared across agencies. Public users can also request services from multiple agencies with one public user account. For instructions on how to create a delegate user specific to the public user group for ACA creating records, see .
Any external user granted access to information at a sub-agency is controlled by the sub-agency administrator in two ways: one way is Agency FID configuration, the other way is user account permissions assigned to the delegate user.
To create a delegate user account, an agency must define, grant permissions, and enable access to an external agency user. This is done by creating a regular agency user account that is specifically designated for the user outside of your agency. Your agency creates a user account, grants permissions, then establishes a relationship between your agency User ID to the User ID from the external agency using the delegate user administrator. If your agency User ID and external agency User ID does not create the delegate user relationship between each other, the delegate, or external agency user, has no access to your agency database. It also requires your agency and the external agency to share information in a common database. This is used when you search and select the delegate User ID from the external agency to establish the link between your agency and the external agency. To review how your agency and the external agency can share information, see .
For example, the State of Oregon may have associations with Marion County, the city of Portland, and the city of Sandy. Oregon is the parent agency. Marion County, Portland, and Sandy are sub-agencies. Betty Greenwood, a user at Oregon, needs access to Marion County and Portland, but not to Sandy. Marion County and Portland each create a regular user account and grant user access at their discretion. After Marion County and Portland create the user account, they designate this user account for the delegate user, Betty Greenwood from Oregon. Oregon must share Betty’s User ID with both Marion County and Portland. The administrators link her User ID with the designated user account in the delegate user portlets. When Marion County and Portland establish this relationship, Betty can switch between the different agency locations. She has access to Oregon, Marion County, and Portland after logging into Civic Platform, but does not have access to Sandy. Marion County and Portland can change Betty’s access at any time. The delegate user history portlet displays any changes to Betty’s delegate user account.
Civic Platform and Citizen Access support this feature. It requires Standard Choices configuration for setup. The parent and sub-agencies must also share information in a database for complete functionality. Refer to . If your agency uses ACA, please refer to . This section provides details on how to set up the Public User group as a delegate user for ACA.
For information about how to configure a regular user account, refer to the “Adding a User” section in the “User Profile” chapter in the Accela Civic Platform Administrator Guide.
Topics
Configuring Delegate User Administrator
Expose the delegate user portlets and enable the ability for delegate users to switch between the main parent agency and sub-agencies through Functional Identification (FID) configuration. This section provides FID configuration details for Civic Platform. An important configuration consideration is that administrators must set up these FID configurations for each agency. It is possible that the settings for the FIDs associated with delegate user administrator may differ from agency to agency. Please pay special attention to the access specifications and the effects on a delegate user in and . For example, Sandy may have FID 0286 set to Read-Only and Oregon may have 0286 set to Full-Access which provides delegate users full access to information at Oregon, but restrict them to only viewing information in Sandy.
To configure the delegate user administrator
Navigate to Civic Platform > User Profile > Groups.
Civic Platform displays the User Group-Search page.
Search and Select the User Group to which you want to apply the delegate user feature.
Configure the Functional Identification (FID) number 0286 Delegate User Management and FID 8403 Multi-Agency Switch. For information on configuring the FIDs, refer to the Accela Civic Platform Configuration Reference.
FID 0286 Delegate User Management is used to control the access of Delegate User Administrator portlets.
|
Full-Access |
When this FID is set to Full-Access, user can create/update/view/delete/search delegate user relationships in the Delegate User portlet. User can also search/view Delegate User relationship history in the Delegate User History portlet. |
|
Read-Only |
When this FID is set to Read-Only, User can view/search Delegate User relationships in the Delegate User portlet and Delegate User History. User cannot create/update/delete Delegate User relationships. |
|
No-Access |
When this FID is set to No-Access, user has no privilege to access the Delegate User Portlet. |
|
FID Setting |
Parent Agency Administrator |
Delegate User Administrator from Parent Agency |
Sub-Agency Administrator |
|
Full Access set at both the Parent and Sub-agencies |
User has full-access. Users can create, update, view, delete, and search delegate user relationships in the Delegate User portlet. Users can also search and view Delegate User relationship history in the Delegate User History portlet. |
User has full-access at both agencies. Users can create, update, view, delete, and search delegate user relationships in the Delegate User portlet. Users can also search and view Delegate User relationship history in the Delegate User History portlet. |
User has full-access. Users can create, update, view, delete, and search delegate user relationships in the Delegate User portlet. Users can also search and view Delegate User relationship history in the Delegate User History portlet. |
|
Full Access set at Parent Agency and Read Only set at Sub-agency. |
User has full-access. They can create, update, view, delete, and search delegate user relationships in the Delegate User portlet. They can also search and view Delegate User relationship history in the Delegate User History portlet. |
User has full access permissions at the Parent Agency and Read-only permissions at the Sub-agency. |
Read Only Permissions: User can view and search Delegate User relationships in the Delegate User portlet and Delegate User History. They cannot create, update, or delete Delegate User relationships. |
|
Full Access set at Parent Agency and No Access set at the Sub-agency. |
User has full-access. They can create, update, view, delete, and search delegate user relationships in the Delegate User portlet. They can also search and view Delegate User relationship history in the Delegate User History portlet. |
Full Access at parent agency. No access at Sub-agency. |
No Access. |
|
Read Only set at Parent Agency. Full Access to Sub-agency. |
Read Only Permissions: User can view and search Delegate User relationships in the Delegate User portlet and Delegate User History. They cannot create, update, or delete Delegate User relationships. |
Read Only permissions at Parent Agency. Full Access Sub-agency |
User has full-access. They can create, update, view, delete, and search delegate user relationships in the Delegate User portlet. They can also search and view Delegate User relationship history in the Delegate User History portlet. |
|
No Access at Parent Agency. Read Only Access at Sub-agency. |
No Access. |
No Access at Parent Agency. Read Only Access at Sub-agency. |
Read Only Permissions: User can view and search Delegate User relationships in the Delegate User portlet and Delegate User History. They cannot create, update, or delete Delegate User relationships. |
FID 8403 Multi-Agency Switch is used to control the privilege of toggling between multiple Agencies. The functionality differs a little between Civic Platform and Civic Platform. The descriptions below provide these differences:
|
Civic Platform can enable the ability to toggle between agencies by two different FIDs. The Multi-Agency switch controlled by FID 8403 offers more functionality and overrides FID 8098 when administrators have both set to Full-Access. |
Civic Platform Agency Switch Functionality:
Full-Access: When FID 8403 is set to Full-Access and the user is defined as a Delegate User, an agency drop-down list displays in Civic Platform. The user can toggle between agencies by selecting an agency from this drop-down list. For a graphical representation of this list, refer to . The agency drop-down list only displays to users that have a delegate user account.
When FID 8403 is set to Read-Only and No-Access: Users do not have privileges to switch between agencies. The Agency drop-down list does not display to users even if they are defined as a Delegate User.
Civic Platform Classic Administration Agency Switch Functionality:
Full-Access: A Delegate User views an agency drop-down list in the upper area of Civic Platform. The user toggles between agencies by selecting an agency from the drop-down list. See . If the user is not defined as a Delegate User, the older existing FID 8098 Agency Switch business logic is implemented.
Read-Only and No-Access: The new Multi-Agency Switch is not available. The user can only use the older existing switch logic using FID 8098 Agency Switch if it is enabled.
|
FID Setting |
Regular Parent Agency User |
Delegate User from Parent Agency |
Regular Sub-agency User |
|
Full Access set at both the Parent and Sub-agencies |
The user does not view the new Agency Switch drop-down list. They must be assigned to a delegate user account at another agency. |
The new “Agency Switch” drop-down list is available at the top of the parent agency page. User toggles between agencies to which they have access. They can perform regular user functions based on the delegate user permissions on the User ID at the sub-agency. |
Not Applicable. No Parent Agency Access. |
|
Full Access set at Parent Agency and Read Only set at the Sub-agency |
The user does not view the new Agency Switch drop-down list. They must be assigned to a delegate user account at another agency. |
The new “Agency Switch” drop-down list is available at the top of the parent agency page. User toggles between agencies to which they have access. They can only view information to which they have permissions set on the delegate User ID at the sub-agency. |
Not Applicable. No Parent Agency Access. |
|
Full Access set at Parent Agency and No Access set at the Sub-agency |
The user does not view the new Agency Switch drop-down list. They must be assigned to a delegate user account at another agency. |
The new “Agency Switch” drop-down list is available at the top of the parent agency page. The drop-down list populate the agencies to which they have access. They do not have access to this sub-agency. Civic Platform eliminates the sub-agency from the list of available agencies in the drop-down list. |
Not Applicable. No Parent Agency Access. |
|
Read Only or No-Access set at Parent Agency |
Not Applicable |
The new “Agency Switch” functionality is not available. |
Not Applicable. No Parent Agency Access. |
A delegate user is a regular agency user account that is specifically designated for a user located outside of your agency. You create a delegate user to assist with the management of multi-agency information. Creating a delegate user account requires two main steps. First, you must create a user account for the external agency user at your agency. Then you must link that user account with the User ID from the external agency to create the delegate user account in the Delegate User portlets.
When the delegate user account is established, the external user has access to both the main agency and sub-agency. The delegate user account can only relate to one external agency user.
If your agency implements Citizen Access, you must create a delegate user account with the public user group. This allows public users to access information and/or request services from multiple agencies after logging in. Please refer to for detailed configuration steps.
This feature requires Functional Identification (FID) setup. Refer to for configuration details.
To create a new delegate user
Create a user account and grant permissions at your agency designated for an external agency user.
Navigate to Civic Platform > Admin Tools > User Profile > User.
Click the Add button and complete the user fields. Refer to “Adding a User” in the “User Profile” chapter in the Accela Civic Platform Administrator Guide.
In the User Group/Privilege section, mark the check box next to each module that you want the user to be able to access.
Assign which user group the external user belongs to for each module.
Click the Save button.
Define the Delegate user account. This account links the agency account with the external agency user account.
Navigate to Admin > Setup portlet > System Tools > Delegate User
Civic Platform displays the Delegate User portlets.
Click the New button.
Civic Platform displays the New Delegate User portlet.
Complete the fields as described in .
Click the Save button.
|
Field |
Description |
|
Allow Delegate User Login |
Mark the option to allow the delegate user to log in to your agency. |
|
Delegate User ID |
This is the delegate user’s User ID created at your agency. Click the picker icon to search and select the User ID. Refer to in the “ ” section. |
|
Parent Agency |
Use the drop-down list to select the delegate user’s primary agency location. |
|
Parent User ID |
Enter the delegate user’s User ID at his primary agency. Click the picker icon to search and select this information. |
|
Status |
Use the drop-down list to select the user’s status. Select Enable to activate or Disable to deactivate the delegate user account. |
Creating a Delegate Account for a Public User Group
A public user can view multi-agency information, or view request services from various agencies from one user login. This is done by creating a public user delegate user account. This process requires you to setup a regular user account at the agency level. You do not need to set permissions as they do not apply in ACA. After the regular user account is created, you link the user account with a public user group at an agency using the delegate user portlets.
This feature requires Standard Choices configuration for implementation, refer to .
To create a public user delegate user account
Create a user account at your agency designated for the public user group. You do not need to assign permissions.
Navigate to Civic Platform > Admin Tools > User Profile > User.
Click the Add button and complete the user fields. Refer to the “Adding a User” section in the “User Profile” chapter of the Accela Civic Platform Administrator Guide. You do not need to assign this user any permissions.
Click the Save button.
Define the Delegate user account. This account links the agency user account with the public user group.
Navigate to Admin > Setup portlet > System Tools > Delegate User
Civic Platform displays the Delegate User portlets.
Click the New button.
Civic Platform displays the New Delegate User portlet.

Complete the Delegate User fields as described below:
|
Allow Delegate User Login |
Mark the check box to allow public user access to multi-agency information. |
|
Delegate User ID |
Use the picker icon to select the agency user account created for the public user group. Refer to in the section. |
|
Parent Agency |
Use the drop-down list to select the agency to which you want public users to have the multi-agency access. |
|
Parent User ID |
Click the picker icon to search and select PUBLICUSER. |
|
Status |
Use the drop-down list to select the delegate user status. Select Enable to activate or Disable to deactivate the delegate user account. |
Click the Save button.
Enabling Delegate User Agency Access
Your agency can allow a delegate user from another agency to access your data in Civic Platform for viewing or performing tasks. The delegate user can perform tasks or view information in your agency only when the delegate user relationship is established. Enable or disable delegate user access to your agency at any time. For information on how to setup a new delegate user, see .
To enable a delegate user
Navigate to Admin > Setup Portlet > System Tools > Delegate User.
Civic Platform displays the Delegate User portlets.
Search and select a delegate user. If the delegate user account is not established, refer to .
Civic Platform displays the Delegate User detail portlet.
Mark the option to allow the delegate user access to your system at login.
Click the Save button.
Searching and Editing Delegate User Information
You can search for and edit delegate user information at any time. You may want to do this to inactivate a delegate user. Any changes to delegate user information are stored and accessible for viewing in the Delegate User History portlet. Refer to .
If you want to change permissions for the delegate user, you must make those changes to the user account profile you established at your agency for the external user. For example, you may want to change a user’s access from full access to view only. This limits a delegate user from making changes. See or refer to the “Editing a User” section in the “User Profile” chapter in the Accela Civic Platform Administrator Guide.
To search and edit delegate user information
Navigate to Admin > Setup portlet > System Tools > Delegate User.
Civic Platform displays the Delegate User portlets.
Click the Search button.
Civic Platform displays the delegate user search portlet.

Enter search criteria in one or more of the delegate user fields, then click Submit. Refer to .
Civic Platform returns a list of delegate users that meet the search criteria.
Select the delegate user to which you want to modify information.
Civic Platform displays the delegate user detail in the Delegate User detail portlet.
Make modifications. Refer to for details regarding each delegate user field.
Click Submit.
The delegate user history portlet provides a running history of the delegate user account. It indicates an operation name and corresponding date. For example, it shows the date when the delegate user account was created or when an account was deactivated and then reinstated. This portlet does not display changes to user permissions nor changes to tasks the delegate user performed. Search and select historical information using the delegate user search feature.
To view delegate user history
Navigate to Admin > Setup portlet > System Tools > Delegate User.
Civic Platform displays the Delegate User list portlet.
Select the delegate user to which you want to view history. If the delegate user does not exist anymore, click the Search History button and enter your search criteria.
Civic Platform displays the delegate user details in the delegate user secondary detail portlet.
If the delegate user exists, click the Delegate User History tab to view history.
Civic Platform displays a list of delegate user history to view.

Select the historical event you want to view. If necessary you may search for a specific event.
Click the Search button.
Civic Platform displays the Delegate User History Search portlet.

Enter your search criteria. Refer to .
Civic Platform returns a list of applicable results.
Toggling between Agency Locations
Civic Platform provides a way for a multi-agency user to switch from one agency to another. After a user logs into their primary agency, Civic Platform displays a drop-down list in the upper areas of the page. This list is populated with the sub-agencies to which they are granted delegate user access.
To switch between agency locations
Do one of the following:
To switch between agencies in Civic Platform, use the drop-down list in the upper area of your page.

To switch between agencies in Civic Platform, use the drop-down list in the upper area of your page.

Multiple Agency Service Management
Civic Platform provides the ability to manage services that multiple agencies offer by for public users. A public user can request services for records offered from multiple agency locations using one ACA login. For example, the public user can request a water pipe repair with Maricopa County and a sewer repair with Portland city after logging into ACA. The one login provides access to all services to which they have permissions.
Manage the services offered by associating it with a record type. You can also associate the service with a licensed professional type. For example, a licensed commercial contractor may have access to request plumbing or water service repairs. You can also associate an address type with a service. For example, 123 Main Street is a commercial building and has access to roof repair, water, and plumbing services offered by the State, county, and city. For more examples of service configurations, refer to .
Use the Service Lock Condition feature to filter the offered services. This provides the option to exclude services to a particular address or licensed professional.
Administrators for the super agency can use the Service Group feature on the Cross-Agency Settings page to group services across agencies or within an agency, and sort service groups and services.
In order for complete feature functionality, you must consider these configurations. The multi-agency services feature applies to ACA; therefore the public user group must have an associated delegate user account to allow users to view the services offered from multiple agencies. See . If you want to provide public users the ability to request services from multiple agencies, you must configure Civic Platform to create records that accommodate multi-agency functionality. This requires matching service configuration as ASI subgroups at the parent and sub-agency level. Refer to . You must configure all agencies providing services to share information. Refer to .
Topics
Configuring Multiple Agency Services
In order for your agency to use the multiple agency services management feature, you must configure the related Functional Identification number, Standard Choices, and EMSE script.
Set Functional Identification (FID) number 0292 Admin-Service to enable the multi-agency services management functionality.
Configure the Standard Choices Values for the MULTI_SERVICE_SETTINGS Standard Choice to define the main agency, the service lock condition filter, and to indicate which services are attached to each agency.
For information on configuring the FIDs and Standard Choices, refer to the Accela Civic Platform Configuration Reference.
To configure the ability to manage services offered by multiple agencies
Enable FID 0292 Admin-Service to turn on the Multi-Services feature.
Navigate to Civic Platform > Agency Profile > Standard Choices.
Civic Platform displays the Standard Choices-Search page.
Configure the MULTI_SERVICE_SETTINGS Standard Choice. This Standard Choice is used to define multi-agency functionality. The multi-agency services feature requires the configuration of three Standard Choices Values.
|
ALLOW_SERVICE_LOCK_SEVERITY |
Value Desc. Yes or No. Yes enables the ability to lock services by condition. |
|
IS_SUPER_AGENCY |
Value Desc. Yes or No. The main agency, also known as super agency, must set this item to Yes, sub-agencies should set it to No. ACA system uses this value to determine if the current agency is a super agency. |
|
AGENCY_LOGO_TYPE |
Value Desc. LOGO_TYPE_CATEGORY. This logo type is used in ACA to indicate which agency and associated agency logo that the service is attached to. This standard choice must match the Standard Choices Value in the LOGO_TYPE_CATEGORY Standard Choice. Refer to . |
Set agency priority definitions in the Agency Priority EMSE script. This script determines which agency has priority over other agencies should multiple agencies offer the same service.
This feature is useful for offering services from multiple agencies to your public users through ACA. You can add any service offered by your agency or a service from an agency to which you share information. See . Each service relates to a record type and a licensed professional or address type. For example, see . These configurations determine which services users can view in ACA. A pre-configured EMSE (Event Manager and Script Engine) script determines which agency is used in case multiple agencies offer the same service.
The public user group or agency user must have a delegate user account to view services. Refer to for configuration information.
To learn more about associating a licensed professional type or address type, see and .
To add a new service
Navigate to Admin > Setup portlet > Agency Profile > Service.
Civic Platform displays the Service administration list portlet.
Click the New button.
Civic Platform displays the New Service portlet.

Complete the fields as described in .
Click the Save button.
Associate a Licensed professional as described in .
Associate an address type as described in .
Click the Save button.
|
ASI Group |
This field is read-only. This field is automatically populated based on the selected Record Type. |
|
ASI Sub Group |
Use the drop-down list to select the ASI sub group, or leave it empty. The ASI sub group sets the scope of the service to a specific portion of the record type. If the ASI sub group is not specified, the service scope is identical with that of the record type. |
|
Record Type |
Click the picker icon to select the record type you want to associate with this service. |
|
Service |
Enter the name of the service. |
|
Agency |
Service Name |
Record Type |
ASI Group |
ASI Sub Group |
Associated Licensed Professional |
Associated Address Type Group |
|
Oregon |
Water Heating |
Plumbing |
Plumbing_services |
WaterHeater_Info |
Contractor |
Address Type Group 1 |
|
Oregon |
New Drain |
Plumbing |
Plumbing_services |
NewDrain_Info |
Architect |
Address Type Group 1 and Address Type Group 2 |
|
Eugene |
Re-roof |
Structural |
Structural_services |
Re-roof_info |
Contractor |
Address Type Group 1 |
|
Portland |
Fishing |
Fishing |
Fishing__services |
Fishing_info |
|
Address Type Group 2 |
Searching and Editing a Service
Search for an existing service and make any updates as needed. For example, you might change the record types associated with the service.
To search and edit a service
Navigate to Admin > Setup portlet > Agency Profile > Service.
Civic Platform displays the Service administration list portlet.
Click the Search button.
Civic Platform displays the Service Search portlet.

Enter your search criteria.
Civic Platform displays a list of services that meet your criteria.
Select the service you want to work with.

Make your modifications. Refer to .
Click the Save button.
Associating License Types with a Service
You can associate a license type with a service. This provides a way for a user to view or to request services that apply with their license type after logging in. For examples, refer to .
|
There may be users or services that do not relate to any license type. Users who do not relate to any license can only view the services that do not relate to any license types. |
You can use this feature with EMSE scripts for license validation. When a customer updates licensed professional information in Civic Platform, an external database can verify the license by using a dynamic web service. This also applies to a licensed professional registered with a public user account for ACA. Validation of license information can occur at the time of login. For information about license validation, refer to .
To associate a license type with a service
Navigate to Admin > Setup portlet > Agency Profile > Service.
Civic Platform displays the Service Administration list portlet.
Search and select the service you want to work with.
Civic Platform displays the service details in the secondary detail portlet.
Click the License Type tab.
Civic Platform displays the License Type list portlet.

Click the Look Up button.
Civic Platform displays the License Type portlet.
Enter the Licensed Type Name and Description.

Click the Submit button.
Civic Platform returns you to the License Type list portlet.
Mark the check box next to the license type you want associated with the service.
Click the Select button.
Associating an Address Type with a Service
You can associate an address type with a service. This provides a way for a user to view or to request services that apply to their address after logging in. For examples, refer to .
To associate an address type with a service
Navigate to Admin > Setup portlet > Agency Profile > Service
Civic Platform displays the Service Administration list portlet.
Search and select the service you want to work with.
Civic Platform displays the service details in the secondary detail portlet.
Click the Address Type tab.
Civic Platform displays the Address Type list portlet.

Click the Look Up button.
Civic Platform displays the Address Type list portlet.
Enter the Address Type Name and Description you want associated with the service.
Click the Submit button.
Civic Platform returns you to the Address Type list portlet.
Mark the check box next to the address type you want associated with the service.
Click the Select button.
|
Agency |
Service Name |
Address Type Group |
|
Eugene |
Water Heating |
Eugene |
|
Eugene |
New Drain |
Oregon |
|
Portland |
Re-roof |
Oregon |
Incorporating the Service Lock Condition
You can choose to limit one or more services to a particular licensed professional or address. The Service Lock Condition feature is particularly useful if you want an address or licensed professional locked out of services that a particular agency offers, but may still offer services from other agencies.
When the Standard Choices Value ALLOW_SERVICE_LOCK_SEVERITY is enabled for the Standard Choice MULTI_SERVICE_SETTINGS, Civic Platform provides a Service Lock option in the Severity drop-down list in the conditions portlets for licensed professionals and addresses. Select the Service from the Condition Name drop-down list to lock out that service from the licensed professional or address. If you only want to lock out one service, create a Lock condition and associate it with a service name. Create as many conditions to limit the available services for the licensed Professional or address.
Topics
Adding a Service Lock Condition to a Licensed Professional
Your agency can filter available services for a licensed professional using the Conditions portlet. Provide a service lock on all services for the licensed professional or create a condition to lock out one particular service.
To add a service lock to a licensed professional
Navigate to Licensed Professional.
Civic Platform displays the Licensed Professional list portlet.
Select the licensed professional to which you want to associate a service lock condition.
Civic Platform displays the Licensed Professional details in the secondary detail portlet.
Click the Conditions tab.
Civic Platform displays the Licensed Professional Conditions portlet.
Go to the Severity field and select Service Lock from the drop-down list.
Go to the Condition Name field and select the service to which you want to associate the service lock from the drop-down list.
Click the Submit button.
Adding a Service Lock Condition to an Address
Your agency can filter available services for an address using the Conditions portlet. Provide a service lock on all services for the address or create a condition to lock out one particular service.
To add a service lock condition to an address
Navigate to Address.
Civic Platform displays the Address list portlet.
Search and select the address to which you want to associate a service lock condition.
Civic Platform displays the address details in the secondary detail portlet.
Click the Conditions secondary tab.
Civic Platform displays the Address Conditions portlet.
Go to the Severity field and select Service Lock from the drop-down list.
Go to the Condition Name field and select the service to which you want to associate the service lock from the drop-down list.
Click the Submit button.
Synchronizing Licensed Professional Data between Agencies
Maintain the accuracy of licensed professional information by running a regularly scheduled batch job to synchronize licensed professional data from parent agency to sub-agency. The administrator from the parent agency is responsible for setting up the batch job for data synchronization. When the batch job runs and Civic Platform recognizes that the sub-agency does not have the licensed professional in the database, the licensed professional is created at the sub-agency with same license state, state license number, license type as the one at the parent agency.
For detailed information about batch jobs, refer to “Running a Batch Job” in “Batch Processing” chapter in the Accela Civic Platform Administrator Guide.
To synchronize licensed professional data between agencies
Navigate to Admin > System Tools > Batch Engine.
Civic Platform displays the Batch Engine portlet.
Click the New button.
Complete the Job detail fields as described below.
|
Job Name |
Provide a name for the new job. |
|
Job Type |
Choose System from the drop-down list. |
|
Service Category |
Select License Sync from the drop-down list. |
Click the Save button.
Schedule the Job.
Click the Job Schedule tab.
Civic Platform displays the Job Schedule portlet.
Complete the fields as described below:
Click the Save button.
|
Schedule Status |
Select Active from the drop-down list. |
|
Frequency |
Select Daily from the drop-down list. |
|
Start Time |
Enter the time that you want the job to execute. This time should be a time at which the server is free. |
Grouping Services for Super Agency
Multiple agencies can provide various services, but only administrators of the super agency can set up service groups (see the ) on the Cross-Agency Settings page to group related services within an agency or across agencies. For example, administrators can group “Food Service Establishment” from agency A and “Mobile Food Vendor” from agency B into a new “Food” service group. Or an administrator can group “Barber Shop” from agency A with “Business License,” also from agency A, into a new Health and Safety service group.
One service can be included in multiple service groups. If administrators do not define some services into any specific service group, Citizen Access classifies these undefined services into a service group called Other, which displays at the bottom of the list of service groups.
When public users access the Select Services page in Citizen Access for the super agency, a list of service groups that they can select from appear. They can either select a specific service group to view the services within that group, or they can search for a service by entering service key words.
Service Group Setup on Cross-Agency Settings Page in ACA Admin

Service Groups on the Select Services Page for Super Agency

To group services for super agency
Navigate to Citizen Access Setup > General Settings > Cross-Agency Settings.
Citizen Access Setup displays the Cross-Agency Settings page.
Click the Create New Service Group button or select a service group from the --Select a service group--drop down list.
Citizen Access Setup displays the available service list.
Enter a service group name such as Food in the Service Group Name field.
Designate an order in the Order field for the service group.
To add or remove services:
Select the desired services in the Available Service list on the left and click the Add button.
Optionally, drag a desired service from the Available Service list and drop it into the Selected Service list.
Citizen Access Setup adds the selected services into the service group.
Select the services in the Selected Service list on the right and click the Remove button to remove the undesired services from the service group.
Optionally, drag an undesired service in the Selected Service list on the right and drop it into the Available Service list.
Citizen Access Setup removes the selected services from the service group.
To confirm or cancel your choice.
To confirm your choice, click the OK button.
To cancel your choice, click the Cancel button.
To delete an existing service group, select a service group and click the Delete button.
Cross-agency service group descriptions
Citizen Access Administration includes a description field where you can provide citizens with detailed descriptions of the services offered by the agencies in your multi-agency environment. You can include any relevant information you want citizens to be aware of, including links formatted in standard html.
To add descriptions of the services offered on your citizen-facing website:
Login to Citizen Access Administration.
Navigate to General Settings > Cross-Agency Settings.
Select the service group where you want the description to display.

Enter the service group description. You can include any relevant information you want citizens to be aware of (up to 4,000 characters), including links formatted in standard html.
Click OK to save your changes. You can click the OK button even if it does not have focus. You will receive confirmation that your changes were saved.
When a citizen navigates to the Select Services page, the service group description displays:

Associating a Logo with an Agency
Civic Platform offers a way to give the agency branding so that users can easily recognize the source of information. This is done by associating an image or logo with an ASI subgroup in the Logo portlet of Civic Platform. For example, if your agency relates to other agencies, you can create an ASI subgroup representing each agency and associate the city, county, or state logo with it. This is particularly useful if your agency implements Citizen Access for multi-service administration. During the record creation process, the public user views fees allocated to an application from the state and city which they live. An image displays next to the agency name as an indicator of which fees relate to the state and which fees relate to the city as shown on . The Agency logos appear on the Fee page, ASI Subgroup, and Payment page in ACA.
To configure this feature properly, you must configure the related Standard Choices and upload an image in the administrative Logo portlet. The Standard Choice turns on the logo feature and the Logo portlet allows you to browse and upload the image you want associated with each agency.
Agency Logo View on the Fee Detail page in Citizen Access

To associate a logo with an Agency
Configure the Standard Choices MULTI_SERVICE_SETTINGS and LOGO_TYPE_CATEGORY. The configuration is to define the agency logo type (ASI Subgroup) used in ACA to retrieve the agency logo. For detailed information about Standard Choices, refer to the Accela Civic Platform Configuration Reference.
Navigate to Civic Platform > Admin > Setup menu > Agency Profile > Logo.
Civic Platform displays the administrative Logo portlets.

Choose one of the following options:
Click the New button to create a new Agency Logo association.
Click the name of an existing agency from the Logo list.
Complete or update the Logo fields as described in .
Click the Save button.
|
Agency |
Use the drop-down list to select the Agency name. This is a required field. |
|
Description |
Provide a brief description of the graphic used as the Agency Logo. |
|
File Name |
Click the Browse button to search and select the image you want associated with the Agency. |
|
Logo Type |
Use the drop-down list to select the ASI Subgroup Name. |
|
Logo URL |
Provide the image URL in this field when the image you want to use as the Logo is saved on the Web. |
Viewing and Searching Cross-Agency Records
Cross-agency related records display in one centralized/consolidated view in the record detail page of Citizen Access. No configuration is required for this feature. Citizens can view parent, child, sibling views from multiple agencies. See .
Additionally, citizens can search for records by record status type across all agencies in your multi-agency environment. See .
To view cross-agency related records in Citizen Access:
Navigate to the appropriate module.
Click Search Applications.
Click a record ID, and then select Record Info > Related Records. The default Related Records view for the selected record displays, showing the parent and child relationships of the selected record. This default view shows "directly related records."

Click View Entire Tree for a broader hierarchical view that displays the selected record in relation to its grandparent, child, grandchild, and sibling records:

Searching cross-agency records by status type
Citizens can search for records by record status type across all agencies in your multi-agency environment. To enable this feature, add the Status Type field to your search forms.
To add the Status Type field to your search forms:
Login to the Citizen Access Administration site.
As shown in the screen below, select a module at the bottom of the left navigation pane.
Select the Record Home page in the left navigation pane.
Click the General Search field in the Record Home page on the right.

When you click the General Search section depicted above, the page becomes editable so you can add the Status Type field.
Add the Status Type field by selecting the checkbox in the Field Properties pane on the right.

Click Save.
Click Clear Cache.
Click Rearrange Fields if you want to reposition the field on the form using Form Designer.
Configuring Amendment Record Functionality
Administrators can configure the ability for public users to create an amendment record in the ACA flow process. An amendment record is a child record of the original parent record and inherits some information from the parent record for processing. This type of record creation is useful when a public user wants to renew a license. The public user license information is taken through the renewal process by the child record without affecting the original parent record in any way. When a public user wants to apply for a new commercial license, the public user accesses his current licenses, and click the “Create Amendment” button. With the Create Amendment option, Civic Platform automatically populates the personal, business contact, and other information from the parent record on the amendment license application intake form. The amendment record relates to the original record through the renewal process. When users pay for the associated fees and issue the license is, the new expiration date for the license applies to the original parent record.
In order for this feature to function properly, administrators must perform two configurations. They must define the Combine Button with Record Type section on the Modular Setting page in the Citizen Access Setup. This determines records of what type and at what status can offer the Create Amendment button option. Then, in the Record Type Filter section, an administrator creates or edits a record type filter to include the record types that are available as amendment record types. You can associate a record type filter with the Create Amendment button for all the records in a module that have the Create Amendment button on their Record Detail pages. You can also associate a filter with the Create Amendment button for the records that are of a specified record type and at a specified status. The first setting takes precedence over the second setting. If you want the second setting to take effect, you must not associate any filter to the Create Amendment button in the first setting. If the administrator does not associate any record type filter with the Create Amendment button, the button does not display to public users on the Record Detail page.
For complete configuration details for the Record Type Filter and Combine Button with record type, refer to .
Topics
Displaying the Create Amendment Button on Record Detail Page
To display the Create Amendment button on Record Detail page
Navigate to Citizen Access Setup > Module Settings page.
Citizen Access displays the Module Settings page.
From the Combine Button with Record Type drop-down list, select Create Amendment Button.
Citizen Access displays a list of record types available and a list of record types previously selected to display the Create Amendment button.
Select the record types and record statuses to display the Create Amendment button. These records are the parent records.
Add records to or remove records from the Selected Record Types list:
To add a record to the Selected Record Types list, highlight the desired record type in the Available Record Types list, click the Add button.
To remove a record from the Selected Record Types list, highlight the desired record in the Selected Record Types list, and click the Remove button.
Select the record status from the Application Status list:
Citizen Access Setup displays a red flag next to the record type name as an indication to you that the status options are modified.
Highlight the desired record type in the Selected Record Types list.
Citizen Access Setup displays the available statuses in the Application Status list.
Mark the check boxes for the desired statues.
Click the OK button.
To create a record type filter
For detailed information on how to create a record type filter, see .
Associating a Record Type Filter to the Create Amendment Button
To associate a record type filter to the Create Amendment button
For all the parent records in a module that have the Create Amendment button on their Record Detail pages.
Those records may be of different record types and at different record statuses, depending on which record types and what statuses you specified in the Combine Button with Record Type section. For detailed information, see .
Navigate to the module Record Details page.
In Record Details page, click Create Amendment button.
In Field Properties, click the Value cell next to Record Type Filter and select the desired filter from the drop-down list.
For the parent records that are of a specified record type and at a specified status.
The setting in the Record Details page takes precedence over the setting below. For the setting below to take effect, you must not select any filter in the Record Details page.
Navigate to the Module Settings page.
In Combine Button with record type, select a particular record type and a record status.
Highlight the selected status name.
Citizen Access Setup displays a drop-down list at the bottom of the section.
Select a filter from the drop-down list to associate it to the Create Amendment button.
Repeat the to to associate each record type status to a filter.
Checking Out Amendment Functionality in Daily Site
To check out amendment functionality in daily site
After configuration, the Create Amendment button is applied to the desired modules, record types and record type statuses.
For example
Public user searches for and opens a parent record.
The user clicks the Create Amendment button on the Record Details page.
Citizen Access displays the available amendment record types.
The user selects the amendment record type and clicks the Continue Application button.
The user then completes the rest of the application as a child record. For more information about record type filters, refer to .
Click the Save button.